Monday 18 September 2017

Model Memorial

I think this is a Great War minischap. Standing at attention like that, he just seemed perfect for a statue, and so that is what he has become. The stone here is rather rougher than it would be on a statue in real life, but it works for me. Halford's grey is the undercoat. It then received a bit of drybrushing with lighter greys, then a sepia wash and a green wash in some spots. Lastly, some Ushabti Bone as a final drybrush and to create the writing on the front of the memorial finished it off.

Perhaps I'm oddly sensitive, but it strikes me as a rather sad, sombre piece.


Monday 11 September 2017

Ruined statue

I bought this touristy damaged statue a long time ago in Greece. I can't recall who it's supposed to represent, but underneath, it's metal on a marble base. I daubed a mess of filler and sand atop the metal to obscure both the detail and mould lines. I then hit it with some creams, greeny-yellows, greys and browns. It's large enough for individuals to hide behind, as you can see, and would work well for anything Pulp-based. I can see this chap as the forgotten leader of the Atlanteans or whatnot.


Monday 4 September 2017

Steam Launch 2

Pre-painted stage is here. Here's the finished steam launch on the desk and afloat on the wine-dark sea.


Monday 14 August 2017

Lean-to-cum-shed

This ended up looking really quite huge next to the model, which is going to inform my choices about scaling in future. Fundamentally, I make doors too big, and that then throws everything else off. The window's a bit skewiff, too. Nonetheless, I'm pretty happy with this. The wallpaper that provides the bricks is just great, although one does seem to spend forever painting it. The roof felt is black sandpaper, and the window is that granny grating stuff. I'm knocking up a few buildings at the minute that have a particular feel to them, on which more in due time. Future iterations will either be smaller or have a chimney, because this thing's so big it could be a cottage. The roofing and brick give a suggestion of period, but aren't too specific, I hope. The doorknob needs to be smaller, too.


Monday 7 August 2017

Bunker

Just a little bunker today. I finally got the roof finished last night, long after the main body, so pardon the difference in colours between the two. Unlike previous bunkers, this one isn't designed with 40K Heavy Weapon teams in mind. It has a bit more of a historical feel to it.


Monday 17 July 2017

Steam Launch WIP

There's a nice article in one of the gaming magazines about making a steam launch, and I am easily influenced! 28mm Copplestone German Freikorps chappy for scale.


Crops

Many moons ago I posted a teaser of crop fields. Here are some more pictures. Pic F8 is what the furrowed fields look like before I pop yellow ground scatter all over them. Just wee bits of carpet tile, those.


Saturday 15 July 2017

Terrain: abandoned Wild West building

I picked this MDF kit up at Salute. Apologies for forgetting the company, but whoever it is, they sell a ruined and an in-use version of this one. I really liked the basic shape. I ended up cladding the outside in balsa, and making individual tiles for the roof. The main colour was Army Painter Red spraypaint, with some pre- and post-shading with black, white, their cream colour, and then a bit of drybrushing. I added a few little details, like the logpile and a few tufts of grass, but wanted to leave it fairly empty, both for playability and because it's a abandoned building, so the emptier it is, the more right it feels.


Friday 16 June 2017

Grenfell Tower

The British government has been executing its subjects quite deliberately for the past seven years. They care only about profit, and not at all for people.

First, they came for the sick and the disabled, who couldn't stand up for themselves. People died. Then they did their very best to destroy the NHS, the police and every other element of the backbone of this country. People died.

But even before that, they refused to do any work at all on protecting people in tower blocks. Until the other day, we had been lucky. By sheer chance, this disaster did not fall on us. For the whole reign of this money-grubbing, people-hating government, they have done nothing, not one single solitary thing, to help. Their sadistic, greedy MPs voted down measures aimed at making housing "fit for human habitation". How evil do you have to be to vote like that?

They have crushed your fellow humans. They have beaten them into the dirt. They have starved your brothers and sisters. Finally, they have burned people alive. I hope that at last everyone can see that these monsters have killed too many innocent people at once for it to be ignored.

The Conservative MPs are monsters. They voted in overwhelming numbers for these deaths. Throw them out. Demand another election. Throw out these killers, and put in a government that will not seek to kill the poor and the weak. Give us a government that, even if it doesn't do everything right, at least does not actively seek our destruction for thirty pieces of silver.

Wednesday 18 January 2017

Terrain Teaser: Fields

I've a lot of stuff on the boil at the minute in terms of fields. I was inspired by Mel the Terrain Tutor's tutorials on fields, and have several square feet under construction. Comprehensive photos will follow in due time, but for now, here's a preview.


Monday 16 January 2017

Retro Monday #8: Trojan!

A very early vehicle for this blog here. A scratchbuilt/kitbashed open-topped Imperial Guard Trojan, from back when this blog was young, and actually all about AFVs for my now dusty Imperial Guard army. Hard to believe it's from 2010.


Saturday 14 January 2017

Continuing experiments with Granny Grating brickwork

Bricks and mortar

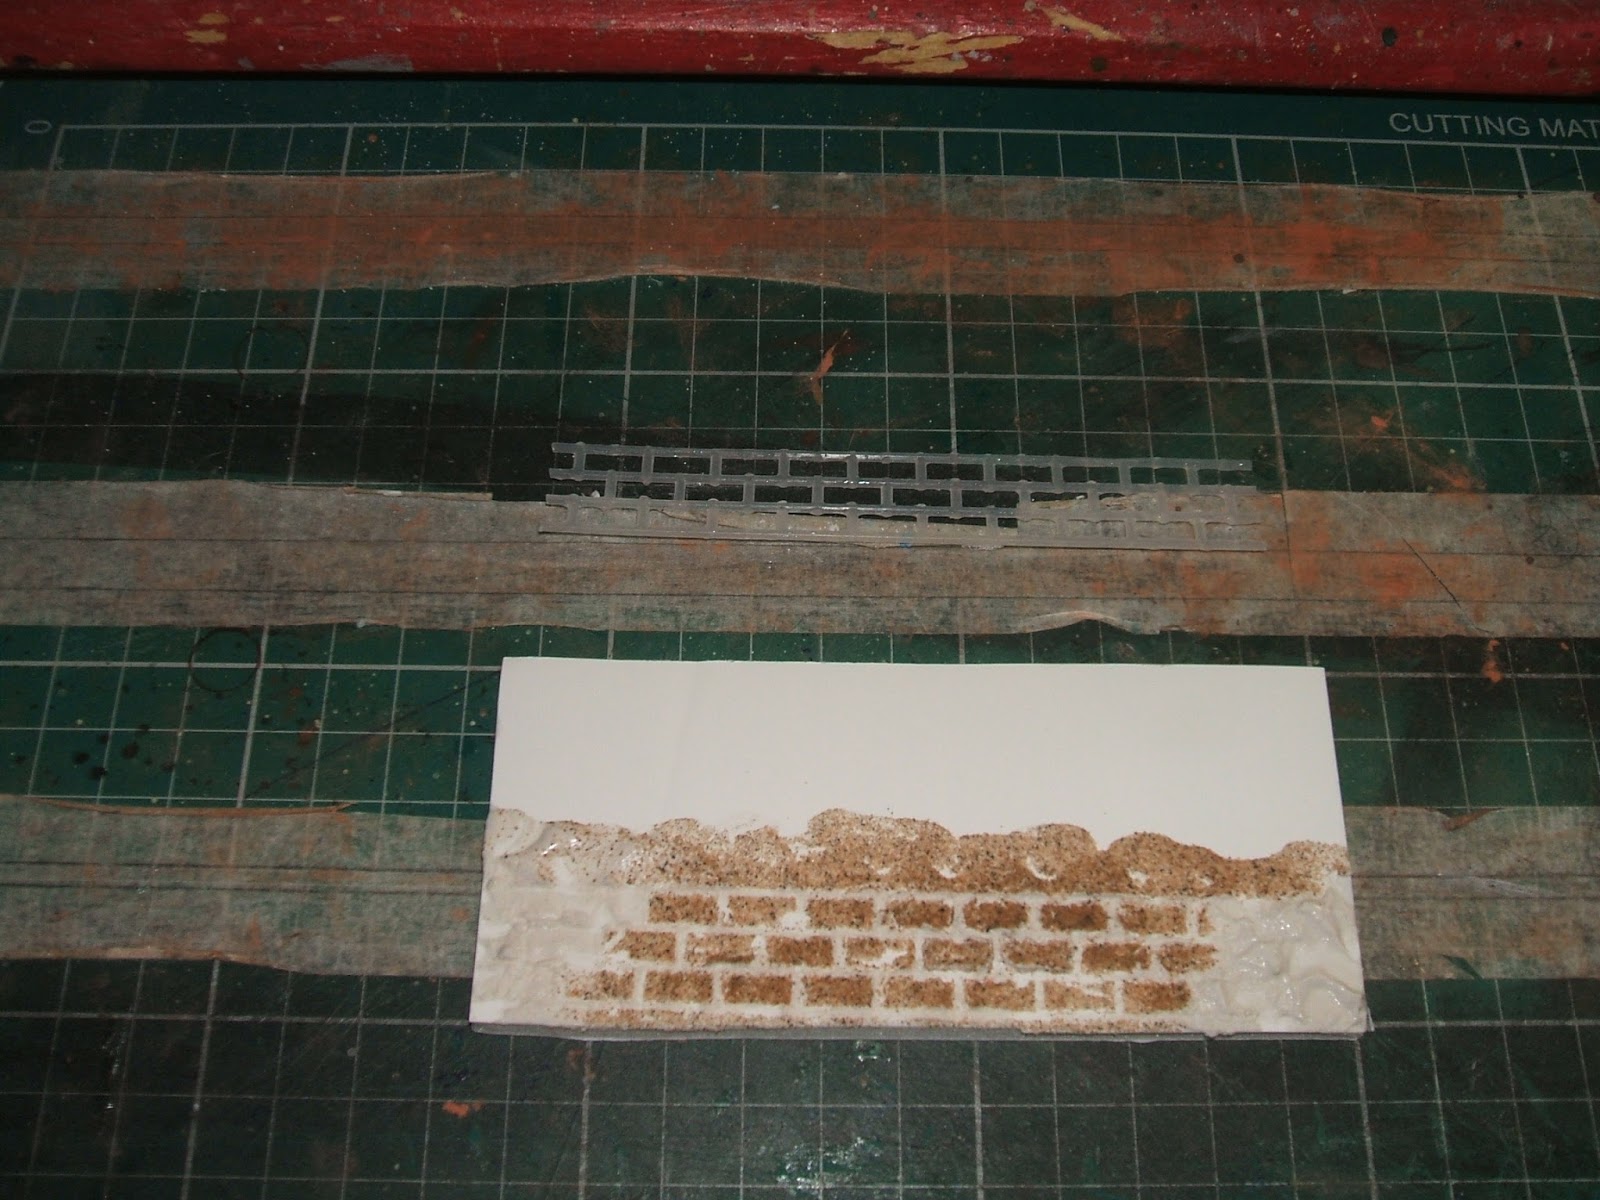
Right, if you've seen the last blog, you'll know I was pretty happy with how the faux-brickwork came out in terms of its shape. So I continued my work. Brickwork always seems to be to be a range of shades. I suppose I must see a lot of recycled bricks. Anyway, I pulled out black, brown, burnt sienna, yellow and red paints, added a little water, and painted some straight onto the bricks, and adulterated some, too. Some got a rich application of colour, and others a more dilute, wash-like one. I then quickly mixed some filler with a little black paint, and began applying it between the bricks as "mortar". It soon became clear that this was too much hassle, and I painted it over the lot with a brush, then dipped my finger in water, and ran it over the bricks, restoring to them some of their original colour.

The benefits of using terracotta clay as opposed to white

There's an interesting point here. Well, interesting for terrain fans. I didn't give the paint on the faces of the "bricks" much time to dry. So when I rubbed off the wash, I am pretty sure I rubbed off some of the paint, too. Here's the thing: I think that actually worked quite well. You see, now I had a wall with bricks in various tones, but all of them showing some of the terracotta Das clay beneath them. It unified the colours. Even better, if it is damaged, it won't show a clean white, but will very closely resemble actual, honest-to-goodness broken brickwork.

Greens and browns

Of course, when the filler dried, it became apparent that a) it had got everywhere, dusting up all of the piece, and b) it was too bright. But that's fine. This is a piece explicitly set aside for experimenting. So I tried washing it with a bit of brown, which made very little difference. For reference, filler is hungry for paint, so you'll need to apply more than you think. I then had a walk around my home to get a look at differences in the brickwork. A great thing I noticed was an area which gets a lot of water and little sun, and has lichen or whatever growing all over the brickwork. I washed some sap green over the bricks in the middle of the wall, and pretty much perfectly recreated the reality of the bricks.

Warmth is clean

As an aside, if you're thinking about doing that, I also paid attention to the brickwork that is at the back of our cooker. It is a lot cleaner because there's no moisture for the lichen to use. While our chimneys are internal (very internal in one case, since a bit of one came down the chimney into the living room the other day!) I would imagine that the brickwork of external chimney stacks will resemble that which is behind our aga. However, there should be more dirt toward the top because of the soot. Anyway, more experiments soon. For now, take a look at how things are going thus far.


Wednesday 11 January 2017

Experiments with Granny Grating

Having picked some of this stuff up a while ago, I have been wondering about its possible uses. The one everyone talks about is as metal grating for floors. I have used it for that in a little experiment I uploaded recently. However, what I'd like to submit for your consideration today is its potential for use as a template. It is a bit of a hassle to do, but it's quite possible to remove some of the struts and create a pattern to use for all sorts of things. My first thought was brickwork, but it's just as good for flooring.

Recently, I saw a video (on Youtube, I assume, but forget) of some folks using sand, cement and templates to create a false impression of a stone driveway. About the same time I saw someone using a similar technique to create a false brick wall. So I experimented along those lines. I cut myself some test templates, mixed up some filler, and daubed it on some scrap bits of foamcard. Then I carefully secured the templates on the filler, and gently sprinkled sand on them. It fell only in between the plastic bars of the grating, so when I removed the template, I was left with something quite attractive.

However, it was imperfect. Despite trying to secure the sand with a PVA-water coating, it would not stick securely enough to resist even nominal handling. Then earlier on I was thinking of making some more sandbag barricades, and drew out my terracotta Das clay. A lightbulb went on in my head. I used a bit of plastic pipe as a rolling pin, applied the template as before, and bam! I scrunched up some tinfoil to apply a bit of texture to the "bricks", and carefully removed the template. Then I gently pressed away the sharpest raised areas created when the template was removed. I did this over the course of less than a minute, and the "wall" did try to come away. It would probably be fine to leave it to set for a few minutes somewhere warm before removing the template again.

In my test piece I applied quite a thick piece of clay. So in future I shall either roll it thinner or do what I mean to do as part two of my test. I am going to mix up some thin thinner and some paint, and apply it between the "bricks" to duplicate the appearance of mortar. Keep your eyes open for that in a future blog.


Related Posts Plugin for WordPress, Blogger...