Sunday 29 August 2010

Stormsword #1:Lego again

Photobucket

Photobucket

Another shape of turret one can make with Lego. Again, it's pretty obvious what I've done here. She's received rivets since this was taken, and I carefully drilled out gas escape holes around the gun's mouth. Later I had a look over some pictures of the FW Stormsword and realised that I haven't made this gun long enough! So I shall end up hiding them when I extend it. Shucks!

Lascannon: scratch your own

When you're building a large number of superheavy vehicles, as I am, then you will probably need a large number of lascannons. Where to get them? Well, you can use leftovers from previous builds, or buy new ones or you can do what I've been doing this afternoon: making my own. I used just a saw, some glue, a knife and two diameters of plasticard tube: 4.0 and 5.5 mm. I cut an inch long piece of the 4.0mm tube, three small slivers of the 5.5mm tube to form what I assume is a radiator common to all lascannon, and then a flash suppressor from 5.5mm tube. Mine is 3/8" long from the top of the front to the back, and 1/8"at the bottom. I used a saw at a 45 degree angle to cut the flash suppressors, as I'm terrible at doing it properly with a knife! Conversely, the saw was too inaccurate to cut the slivers I needed to make the radiator, so I carefully scored them myself. I've made 8 so far, and have the same number to complete.

Photobucket

Photobucket

Saturday 28 August 2010

Banesword #2: Part 4

I'm just off to undercoat her. She's had some rivets, a rear door, a place to install comms antennae, and a bit of plasticard on the central for'ard hull.

Photobucket

Photobucket

Photobucket

Photobucket

Banesword #2: Part 3

A considerable amount of progress today, given yesterday was a day when I got nothing done! She needs more rivets on the sides of the fighting compartment and some more detailing on the aft of same. She's almost ready to go undercoated.

Photobucket

Photobucket

Photobucket

Photobucket

Thursday 26 August 2010

Stormblade #2: Part 1

A bit of a diversion from the Baneswords for a moment. I found a bit of 2mm plasticard in a draw, long since set aside to serve as the base for the fighting compartment of a Stormblade. I had the Lego out already, from working on the Baneswords, so I thought I'd knock up said fighting compartment. This thing's going to be pretty solid, I fancy! The pictures need no explanation for anyone who spent their childhood sticking these blocks together. I just knocked up a superstructure and am building a shell around it.

Photobucket

Photobucket

Photobucket

Photobucket

Photobucket

Photobucket

Wednesday 25 August 2010

Banesword #2: Part 2 and Banesword #1: Part 3

Right, she's really starting to come together with these colours.

Photobucket

Meanwhile, Lego is helping to ensure the straight lines of her sister.

Photobucket

Photobucket

Some slightly mangled tracks at the back there. The fault was (of course!) mine in failing to allow more room. I shall remember next time, unless I forget.

Banesword #2: Part 1

I did a spot of targeted spraying of the Banesword's tracks. So they are now mostly black. But it'll be two-three hours before they're dry and I can proceed further. So for now onwards to Banesword #2. She has no sponsons, having replaced them with ERA for AV14. Her name will probably be Admiral Thrawn.

Photobucket

First job is finishing off the tracks, and then I'll move on to the ever fraught business of trying to line them up properly when gluing them to the main body!

Banesword #1: Part 2

Basic colours are on. Yes, I've got a bit bored of plain yellow. Transfers have been applied. I'll take it out and varnish them forthwith.

Photobucket

Photobucket

Photobucket

Photobucket

Tuesday 24 August 2010

Banesword #1

This chap's been waiting for some love for a few months now, but I've finally got round to finishing off his port HF sponson. I'm just about to take him out for undercoating - lascannon turrets and main gun excepted, of course.

Photobucket

Photobucket

Photobucket

Photobucket

Saturday 21 August 2010

General Terrain II: The Revengening

Some boards I was working on the other day. First, another 4' by 2' board. The grey structures are of polystyrene. The small barricade is a GW piece, as is the old Imperial Guard dozerblade.

Photobucket

Photobucket

This is a 4' by 3' piece, cannibalised from some ceiling tiles and one of Dad's old model railway boards.

Photobucket

General Terrain

Small pieces are all very well, but one can't do battle without a gaming table. As you'll know from having scoured rigorously previous entries, I have plenty of boards for a regular game. However, I hope to host a 15k a side Apocalypse game next summer, and for that I need to finish off a few boards I've been leaving alone for too long. One is this 4' by 2' bit of wood. Originally, it was to be a river board, but I've decided it's to be a dried-up river board now. I've just put some static grass on, and will tomorrow, once the glue's dried, sweep off the excess.

Photobucket

Underneath it is the next large board I need to finish off: a trench board. On completion, I should have twelve foot of trench. Huzzah!

Tents: Big guns never tire, but Guardsmen do.

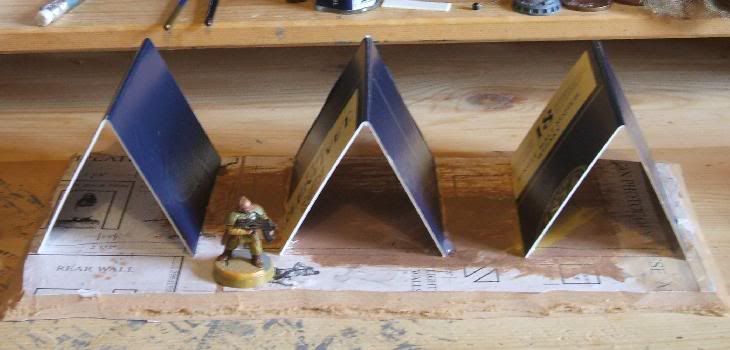
I'm coming up with this as I go along, so it's hard to specify what you'll need to replicate it! You will certainly need a base. And some cardboard. I could claim that you need to buy some very pleasant Scotch, send me the bottle, and then cut up the box, but I don't think anyone would fall for it. Precise dimensions aren't important, in my opinion. One merely needs to generate something which sufficiently resembles a tent on the gaming table. Anyway, to business. I cut the cardboard, using the natural corner of the box as the apex of the tent. I trimmed half an inch off the lower ends to reduce the height of the tents. You could make your tents a bit lower or higher, depending on your preferences. Then I marked out places for the tent on the base, and used a hot glue gun to secure them in place with the least trouble. A hot glue gun is handy because the hot glue rapidly dries. If I'd used PVA, I should have had to pin or hold the pieces in place for quite a time. Behold the tens as they are now, with Lieutenant Farnsworth of 1st Platoon, 1st Coy for scale.

Photobucket

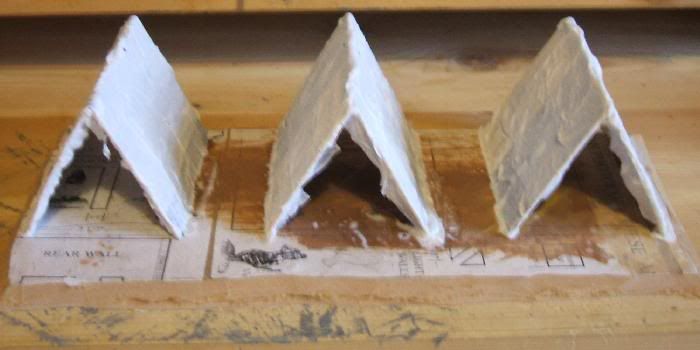
Now you want the PVA. Fetch some toilet roll or tissues. Dilute some PVA with water. Now place the thin paper over the tents, and carefully apply the dilute PVA. You may find it easiest to apply some PVA first, so they paper sit still, and then to carefully apply more. Do be careful here. The card I have used for the tents has a certain resistance to water, but if you are using bare card, the water may warp the tent, producing an unexpected appearance. Once you've glued the paper to your cardboard frame, set it aside to dry. The airing cupboard is often recommended for this purpose, so do take care not to glue your work to the best bedlinen!

Photobucket

While this dries, avail yourself, age permitting, of a spot of the Scotch!

Wednesday 18 August 2010

Terrain: Water/Petrol/Liquid Gas &c storage

I'm quite fond of this thing. The main body is from the water reservoir of an old water-pistol (water-rifle?), and the base is from an old Playmobil building - a general store, perhaps. No WIP pictures, only PIP, so I'll do my best to describe in words what I did.

Photobucket

Photobucket

Photobucket

Photobucket

First, I used the hot glue gun to secure the canister to the base. I felt it looked a little unstable, so I glued a couple of polystyrene offcuts either side of it to resemble earth built up under it. There was a screw clearly visible at one end, so I popped the back of an old Imperial Guard searchlight over it. I sawed the nozzle off the other end. I used some bits of spare scenery from a company I cannot now recall to cover the subsequent hole. I cut two thin strips of plasticard and superglued them around the main body as it looked rather bare. I applied rivets to these strips and to the ridged area that was part of the original canister. If rivets wouldn't stick, I drilled a hole to suggest they'd popped out.

Then I applied PVA, got sand over everything, let that dry, and hit it with a diluted PVA to lock the sand in. Once that had dried I hit it with a basecoat of Halford's yellow car primer. Then I covered the contained itself with Army Painter's blue spraypaint. Then I mixed some Prussian Blue Boldmere acrylic paint with a little Games Workshop Chainmail and water, and applied that over the top of the Army Painter. After that, I applied a slightly diluted layer of GW Asurmen Blue wash. The goldwork first received a layer of GW Shining Gold, then a layer of Citadel Colour Burnish Gold. I wonder if they still make that. I then applied a GW Devlan Mud wash, before picking out rivets and some details and scratches with GW Mithril Silver. I used some brown house paint for the brown on the base, but that needs another couple of layers, as you can see!

Baneblade 3: Part V

As you will have surmised, real life interposed itself when I was trying to finish off the third Baneblade. However, I've got things a bit more under control these last few days, and now I present to you the third and final Baneblade of my IG force.

Photobucket

Photobucket

Photobucket

Photobucket

Photobucket

Photobucket

And here she is with her brethren.

Photobucket

Photobucket

Photobucket

I've lately sold some model trains, and couldn't restrain myself. So keep your eyes open for the third Shadowsword coming this way soon!
Related Posts Plugin for WordPress, Blogger...