Sunday, 31 March 2013
Happy Easter!
Surrexit hodie Christus was the fourteenth century hymn on which today's mass' first hymn was based. I hope you're all having a lovely day, whether in the joy of the risen Lord or in the joy of chocolate. ;) Happy Easter, folks!
Friday, 29 March 2013
Terrain Mega-Project: Tower continued!
I have begun work on the monster! I cut out some floors for the quadrants. I am 70% sure I shall be going with the external lift-shaft suggested by Porky, but for now I am just omitting one of the quadrants, so I retain the option of having an internal one. The floors are made from a layer of 5mm-thick foamcard. I then cut a layer of 0.5mm-thick plasticard, and scored half-inch squares in it to give the impression of a tiled floor. I cut through some squares, suggesting that whatever has happened to the building, some of the tiles have been broken and dislodged. I cut a few doors from 0.5mm-thick plasticard: 2" by 1.5". I laminated two pieces, cutting a hole in the middle of one, giving the impression of a door-frame around a sliding door. I have glued several of the upper floors in place. I was a little worried, having done so, that it could prove difficult to move models around when they are close to the middle, but this proved not to be the case.
Recently I have been trying out this idea of inserting pictures into the text, but it hasn't been going so well. Everything looks fine when I type the post up, but once it's published, I realise the system just hates me. So in future tutorials I shall be going back to labelling things with numbers. For now I'm just going to throw a load of pictures at you. They're pretty self-explanatory, and this isn't a tutorial, so no need to worry. Keep your eyes peeled for a tutorial in a few months!


Recently I have been trying out this idea of inserting pictures into the text, but it hasn't been going so well. Everything looks fine when I type the post up, but once it's published, I realise the system just hates me. So in future tutorials I shall be going back to labelling things with numbers. For now I'm just going to throw a load of pictures at you. They're pretty self-explanatory, and this isn't a tutorial, so no need to worry. Keep your eyes peeled for a tutorial in a few months!


Wednesday, 27 March 2013
Terrain Tutorial: Nissen-inspired hut
This is not quite a Nissen Hut, as those were formed from corrugated metal, whereas this version is smooth. But if you want to make a version that is truer to life, all you need to do is glue some corrugated card to the outside of this creation.
Desiderata:
* Base
* Large cardboard tube
* Hot glue gun and glue sticks
* Cardboard of plasticard for detailing
* Polystyrene cement
* Superglue
* A few bits and pieces from your box of bits
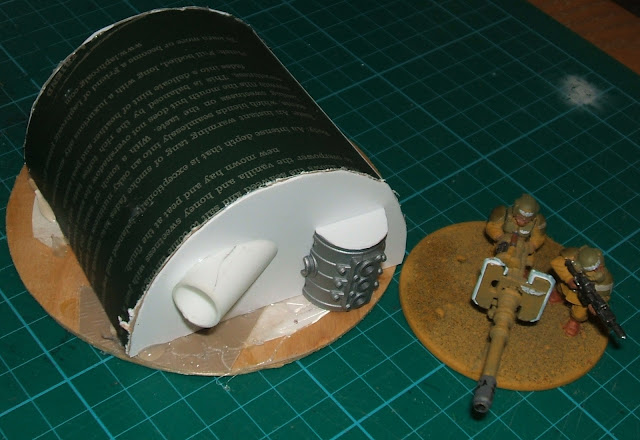
1) Cut a large cardboard tube down. Measure your base so you can be sure it will fit on it. So you will probably have a tube a couple of inches tall. Cut the tube in half so you have two little tunnels.
2) Glue them to the base with the hot glue gun, and glue a big sheet of plasticard or card on either end. Let it set, and then trim it. Knock up a door from plasticard, and glue another few small bits to the outside to detail the structure. See Figs. 1&2.

3) Apply some PVA to the base, let it dry, and coat it with some dilute PVA to lock it in. Once dry, paint the building. I applied the old Foundation Knarloc Green, I think, and then stippled a variety of other colours atop that: yellow, black, light and dark green, and dark brown. Then I applied a load of Agrax Earth across the whole thing. See Figs. 3&4.


Until next time, folks, happy 'gaming!
Desiderata:
* Base
* Large cardboard tube
* Hot glue gun and glue sticks
* Cardboard of plasticard for detailing
* Polystyrene cement
* Superglue
* A few bits and pieces from your box of bits
1) Cut a large cardboard tube down. Measure your base so you can be sure it will fit on it. So you will probably have a tube a couple of inches tall. Cut the tube in half so you have two little tunnels.
2) Glue them to the base with the hot glue gun, and glue a big sheet of plasticard or card on either end. Let it set, and then trim it. Knock up a door from plasticard, and glue another few small bits to the outside to detail the structure. See Figs. 1&2.


3) Apply some PVA to the base, let it dry, and coat it with some dilute PVA to lock it in. Once dry, paint the building. I applied the old Foundation Knarloc Green, I think, and then stippled a variety of other colours atop that: yellow, black, light and dark green, and dark brown. Then I applied a load of Agrax Earth across the whole thing. See Figs. 3&4.


Until next time, folks, happy 'gaming!
Tuesday, 26 March 2013
Occasional Irritated Blog
As you know, Bob, I've been out of work for a bit. So I have an employment advisor. I made a big mistake last time I was supposed to see her. I overslept. I was a bit worried about volunteering at a shop in town. It's nothing serious, just the residue of a social anxiety so crippling I hadn't worked in half a decade. She was upset I missed our last meeting, so when we met this morning I got loads of unusual questions. It's reminded me of the importance of deceit. I shouldn't have told her the truth about why I missed our last session. I ought to have lied. When I went along today I should not have responded honestly to her questions, as it's only got her annoyed with me.
I've been applying for admin jobs for a while. One sits in an office, entering stats into a computer, and waits with growing boredom for the day's end. I know this is what they are like, because they are the only 9-5 form of employment I have had, and three different employers had the same impact. Roughly the same impact: the first job was so boring (typing up documents) that I would get home and lie on the carpet for half an hour as blood gradually flowed back to my brain. I'd like to say this is comic exaggeration, but it isn't. Some people might like them, but I'm not one. Nonetheless, these are the jobs I've been advised to apply for. I have good qualifications, but a terrible (atrocious, dreadful, abominable, diabolical?) work history, so I accept they are a necessary stepping-stone.
Sadly, "stepping-stone" was an even worse thing to say. She asked if I thought such jobs were beneath me, and I said the worst thing possible: "Er." I won a lecture on my ego, and an admonition to find a job I really want to do which can fill the time until I can go into teaching. Problems: I don't know what I want to do because I haven't got the breadth of work experience. Asking for help gets the awful answer "Only you know what you will enjoy doing." Third problem: this doesn't mesh with the mindless government job-seeking orders, which are to check their website and apply for one job daily, and to check several other places and apply for one job from each every week. By telling the truth I have just increased my pointless workload by at least 10%. I say pointless because nobody ever gets back to me. I have had maybe half a dozen responses in the past year and a half, and one invitation to interview. I reached that place and there wasn't anywhere to park in their car park. Or in the road outside. Or in any adjacent car park.
I furrowed my brow pathetically, and sought to convey those ideas with words, but failed abominably, as I only got the same spiel again. So now I have to do all the government-mandated job applications, which never get any results, and I have to come up with some job I can pretend means something special to me. In a word, it's been a frustrating morning. I shall have to get my skates on, finish off this spectacular apartment building, and then demand GW Nottingham gives me a job building scenery for them! And pigs might fly. Yes.
Frustrating as this bureaucratic rot is for me, it's a lot worse for many people. I'm fine, really. The worst that'll happen if the government stop throwing money at me is that I won't be able to put petrol in or buy insurance for my car to get to job interviews which never manifest! Spare a thought for my friends, J&T. T's mum's unwell, but the much-hated ATOS have cut the disability benefits she has relied on for years, annihilating their cash reserves. I spent a couple of months working for a big building society once, and I realised the job wasn't for me when I spent Christmas Eve writing threatening letters to people behind on their payments. I left shortly after, though they'd wanted me to stay on permanently. After all, all that's necessary for evil to triumph is that the good do bugger all when confronted with it.
Monday, 25 March 2013
Terrain Tutorial: Rotating Field Gun in a Bunker
First, catch your hare, as I understand Mrs Beeton once wrote.
Desiderata:
* Hot glue gun and glue sticks
* Sand
* PVA glue
* Paint and brushes
* Various sizes of plastic tube (you'll want something thick enough to make the barrel of a tank's gun in your chosen universe)
* Plasticard sheet
* Foamcard
* Basing material
1) Gather your bits and bobs together. It's always a great idea to have everything to hand. See Fig. 1.

2) Cut a strip of 40mm foamcard. This will be the sides of your building. Mark out on your base the diameters of your building, and cut the lengths of this to that scheme. The front should have a gap for the gun to point out and threaten your foes. I made a 15mm gap in the frontage to allow the gun to point out. Knock up a gun from various diameters of plasticard tube. See Fig. .2.

3) Assemble the walls of your bunker with the hot glue gun. Since my base was triangular, so is the bunker. So adapt your bunker to the shape of your base. Knock up a door from pieces of plasticard or card, and glue that to the back of the building. See Figs. 3&4.


4) Get two diameters of plasticard tube, one one of which fits around the other, and glue the thinner one in the middle of your bunker. Note it can be tricky to get a long gun into your bunkr latr, so I recommend slipping it in at this point. See Figs. 5&6.


5) Glue your gun to the thicker tube, which should fit nicely around the thinner one. See Fig. 7. Ensure it rotates freely. See Fig. 8.


6) Paint the interior of the bunker black now. You will glue a roof on the bunker shortly, after which point reaching the innards will be a bother! See Fig. 9.

7) Glue a roof atop the bunker. See Fig. 10.

8) Apply a layer of dilute PVA over the whole of the model except the gun and door, and liberally apply sand. Once this has dried, apply another layer of dilute PVA across it all.
9) Paint the model as desired. See Figs. 11&12.


Happy gaming, folks!
Friday, 22 March 2013
Terrain Mega-Project: Giant Ruined Building
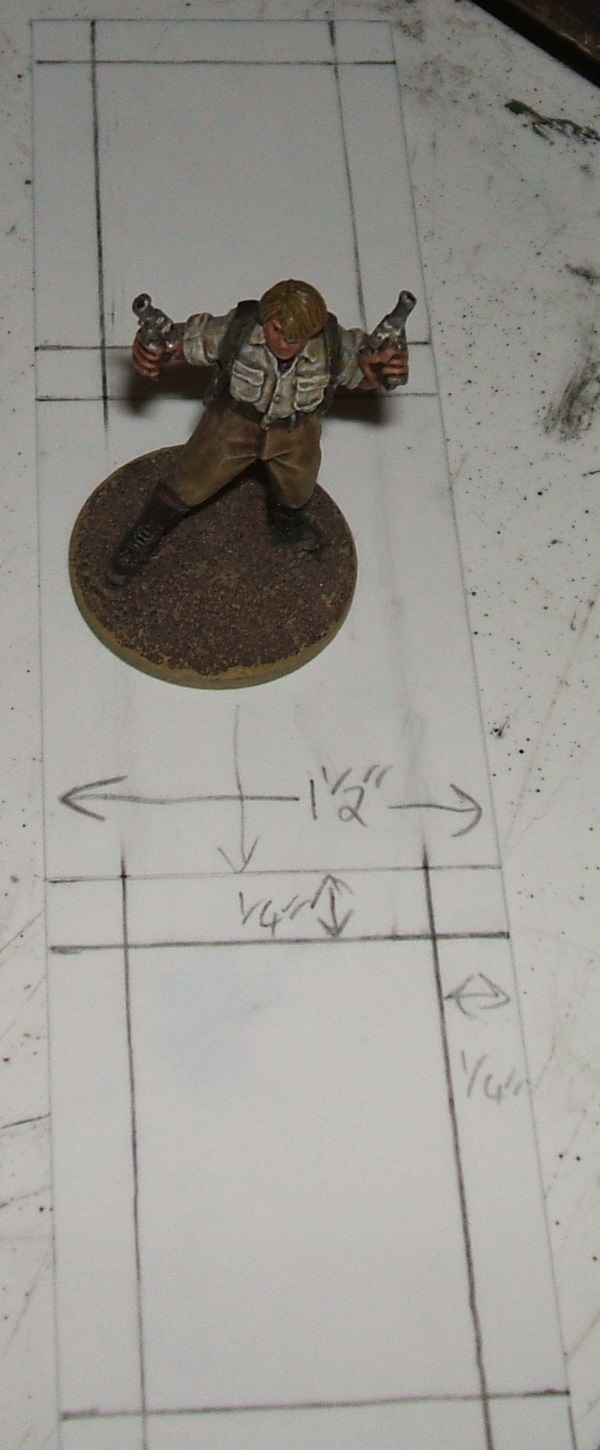
Porky, this is your fault! The other day I put up a tutorial on making a ruined apartment building, which reminded Porky of an old Necromunda demonstration building. He found a picture here, and my deranged mind began to work its mad magic. First, I am not making a ruin with that many storeys, although this plan calls for 3" storeys, whereas the ones in the picture look to be about 2" with pretty thick floors. Anyway, I went up to the attic and peered at things. I knew I would have to get something pretty sturdy. I had bought some wood the other week, and was considering using that when I had a Eureka! moment. In short, I had found the perfect thing: an old table. It's sturdy, so I don't need to worry about it falling apart. It has no legs, but instead some bits of chipboard which go to the floor in an X-shape.
I have a vague conception of how the building will look, but for once I am going to make some proper plans before plunging ahead. This is not because I am getting sensible, but because I don't have enough hot glue to put the floors in place, and will not acquire any until Tuesday afternoon. So until then there will be lots of scribbling and preparation. If anyone has any handy suggestions, by all means send them in! For the time being I present a few shots for you of this planned insanity. The playing space here will be pretty sizeable. My back of the envelope calculation suggests it will be a little over six square feet, if one includes the base. Though I freely admit it won't be much use for tanks (except the base). Take a gander at the sheer size of this bonkers idea. This is going to be a hell of a project, so don't expect it to be finished any time soon.


Until next time, folks, happy 'gaming!
Wednesday, 20 March 2013
Terrain Tutorial: Ruined multi-level urban building
Polystyrene packaging is really great stuff. If you're anything like me, you probably have a mess of the stuff squirrelled away in the attic for some future day. With this tutorial you can knock up a ruined cityscape with comparative ease.
Desiderata:
* Base
* Sharp knife
* Hot glue gun and glue sticks
* Polystyrene packing foam
* Superglue
* Balsa wood
* Balsa cement
* Bamboo skewers
* Paint
* Brushes
* PVA glue
* Sand
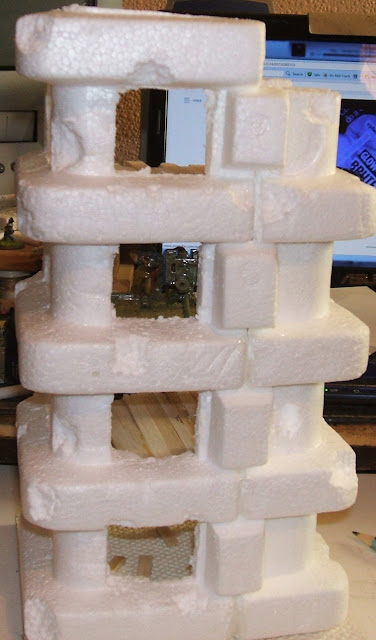
1) Grab some polystyrene packaging foam. I have used a ribbed version, as it will give nice look. Cut it so it looks like a two- or three-side ruin, and test that it fits on your base. Do not yet glue it in place. See Fig. 1.

2) Cut holes in the polystyrene foam for windows, and if the walls are a bit thick, carve some bits off them. Make sure you're going to be able to fit models inside the building once it is finished. So you want their base size and a bit more for leeway. You don't want to be damaging your models by trying to squeeze them into somewhere very small. Glue the bits in place on the base. See Fig. 2.

3) Drive some cocktail skewers through the chunkiest bits of the building at various levels, creating supports for your floors. You don't need to glue these in place, but do ensure that they do not protrude much (if at all) from the polystyrene of the outside of the building. Cut some balsa wood into planks, and roughly break these to about the right length. Glue them in place on the bamboo skewers with the balsa cement. See Figs. 3&4


4) The gap between the two large pieces of packing foam I had used to make the building was a bit obvious, so I glued some offcuts of foam over the worst gaps. See Fig. 5.
5) Next distress your building. Show it a horror film. Or gouge bits out of it so it really looks as though someone has been blowing bits off it for weeks or longer. You can use polystyrene cement, if you like, as it melts foam, but only do so in a well-ventilated area, as it gives off some fumes. Do not make the holes too deep. I found it impossible to get sand and paint into some of the deepest ones I made. Balsa wood really drinks in paint, so I also gave it a coat of varnish at this point. This isn't the final colour; it's just to keep the wood from devouring all the subsequent paint. See Fig. 6. I added some spare planks to the roof, as though a soldier had put them there for some shelter from the rain, and I drove some more bamboo skewers into the roof, so they appeared to be support poles for higher floors long since destroyed. I applied a layer of glue to the building, and tipped sand over it all. This took a few goes, as the building has to be approached from several angles. As usual, leave it to dry, then apply a coat of diluted PVA to seal it all in.

6) Once that has dried, you can set about painting the ruin in your desired colours. See Figs. 7, 8, 9&10.


I hope you enjoyed that, folks, and it gave you some ideas for that polystyrene mountain. Until next time, happy 'gaming!
Desiderata:
* Base
* Sharp knife
* Hot glue gun and glue sticks
* Polystyrene packing foam
* Superglue
* Balsa wood
* Balsa cement
* Bamboo skewers
* Paint
* Brushes
* PVA glue
* Sand
1) Grab some polystyrene packaging foam. I have used a ribbed version, as it will give nice look. Cut it so it looks like a two- or three-side ruin, and test that it fits on your base. Do not yet glue it in place. See Fig. 1.

2) Cut holes in the polystyrene foam for windows, and if the walls are a bit thick, carve some bits off them. Make sure you're going to be able to fit models inside the building once it is finished. So you want their base size and a bit more for leeway. You don't want to be damaging your models by trying to squeeze them into somewhere very small. Glue the bits in place on the base. See Fig. 2.

3) Drive some cocktail skewers through the chunkiest bits of the building at various levels, creating supports for your floors. You don't need to glue these in place, but do ensure that they do not protrude much (if at all) from the polystyrene of the outside of the building. Cut some balsa wood into planks, and roughly break these to about the right length. Glue them in place on the bamboo skewers with the balsa cement. See Figs. 3&4


4) The gap between the two large pieces of packing foam I had used to make the building was a bit obvious, so I glued some offcuts of foam over the worst gaps. See Fig. 5.

5) Next distress your building. Show it a horror film. Or gouge bits out of it so it really looks as though someone has been blowing bits off it for weeks or longer. You can use polystyrene cement, if you like, as it melts foam, but only do so in a well-ventilated area, as it gives off some fumes. Do not make the holes too deep. I found it impossible to get sand and paint into some of the deepest ones I made. Balsa wood really drinks in paint, so I also gave it a coat of varnish at this point. This isn't the final colour; it's just to keep the wood from devouring all the subsequent paint. See Fig. 6. I added some spare planks to the roof, as though a soldier had put them there for some shelter from the rain, and I drove some more bamboo skewers into the roof, so they appeared to be support poles for higher floors long since destroyed. I applied a layer of glue to the building, and tipped sand over it all. This took a few goes, as the building has to be approached from several angles. As usual, leave it to dry, then apply a coat of diluted PVA to seal it all in.

6) Once that has dried, you can set about painting the ruin in your desired colours. See Figs. 7, 8, 9&10.


I hope you enjoyed that, folks, and it gave you some ideas for that polystyrene mountain. Until next time, happy 'gaming!
Monday, 18 March 2013
Terrain Tutorial: Hull-down Tank Emplacement
This is the penultimate word in emplacements. The only larger emplacement you could build in 40K is for a superheavy vehicle, and you would just need to scale this up a bit. Let's get started.
Desiderata:
* Hit glue gun and glue sticks
* Matchsticks
* Foam
* Large base (I used a 12" by 6" piece of plywood, but you just need something large enough to hold your tank comfily. Don't forget your sponsons!)
* Paint and brushes
* PVA glue
* Sand
* Sharp knife
1) Use the hot glue gun to stick some polystyrene to the base. See Fig. 1.

2) Trim the polystyrene to shape. Make sure your hull weaponry and sponsons have clear lines of sight. See Fig. 2.

3) Trim some matchsticks to the right height. Glue them in place with the hot glue gun. Apply dilute PVA over everything bar the matchsticks. Scatter sand over that. Once the PVA has dried, apply another dilute coat of PVAto fix it in place. Once that has dried, undercoat the whole. See Fig. 3.

4) Paint as desired. See Figs. 4&5.


I hope you like that, folks. Until next time, happy gaming!
Friday, 15 March 2013
Terrain Tutorial: Monolith of Doom!
Bottles of shower gel do not make us all think of terrain. Then again, some bottles of shower gel look more promising than others. The one I'm using here is an Original Source bottle. They have a huge array of shower gels, many of which make one salivate mid-shower: orange and cinnamon, vanilla and raspberry, chocolate and mint. I'm not making these up! I'm pretty fond of their Sea Salt and Black Pepper one, even if it sounds to you as though I'm showering in crisps. ;) But onward to the really simple tutorial.
Desiderata:
* Thin plasticard (I used some 0.5mm sheet)
* Pencil
* Sharp knife
* Sand
* PVA glue
* Paint and brushes
* Base
* Hot glue gun and glue sticks
* Empty shower gel container
1) Have a shower. Rinse out the shower gel container, and let it dry.
2) Mark out some glyphs on your plasticard sheet. I decided to stay nice and simple, so used my knowledge of Greek to write LITHOS, which is Greek for stone. Since I'm making a monolith (a lone standing stone) it made me grin a bit. Nobody has accused me of having a good sense of humour, but I make myself smile. :D I carefully cut these out, and glued them to the shower gel container with the hot glue gun. See Fig. 1. Use whichever glyphs or symbols you like, but remember to make them BIG, as they will get covered by sand during construction.

3) Glue the shower gel container to the base, and apply PVA over the whole, before applying sand. The plastic of shower gel containers does not happily accept PVA, so do not dilute is as much as usual, and be prepared to have to do this a couple of times to fill in gaps. See Fig. 2. Apply a coat of dilute PVA to seal this in place, and undercoat the piece.

4) Paint up and finish the model as desired. I chose to apply a slightly lighter highlight over the letters of LITHOS to make them stand out a bit more. See Figs. 3&4.


Until next time, folks, happy gaming!
Wednesday, 13 March 2013
Terrain Tutorial: Sink that tank!
Back in WWII tank turrets were removed from tanks, and immobilised tanks were themselves worked into defensive networks. In 40K Forgeworld, at least, offers the option of purchasing such turrets, and there's no reason not to include them in your SF gaming. Before getting to this tutorial, I'd like to draw your attention to Terrain from Junk, a blog I've just begun contributing to. Many of the articles I have put up on here will fit in well over there, as I'm fond of recycling. I'm only one of a team over there, so there are plenty of ideas that will be new even to long-time readers of this blog. Check it out! Right, onto today's tutorial.
Desiderata:
* Bases
* Hot glue gun and glue sticks
* Wee magnets
* Foamcard or polystyrene foam
* Superglue
* Plasticard or card for detailing
* Paint
* Brushes
* PVA glue
* Sand
* Ruler and pencil
* Short fat yoghurt/dessert pots
* Tank turrets (either home-made or store-bought)
1) Gather your materials. I've got some Alpro soya dessert pots here, specially bought for the occasion. Let it not be said I am not prepared to go the extra (delicious) mile for this blog! ;-)
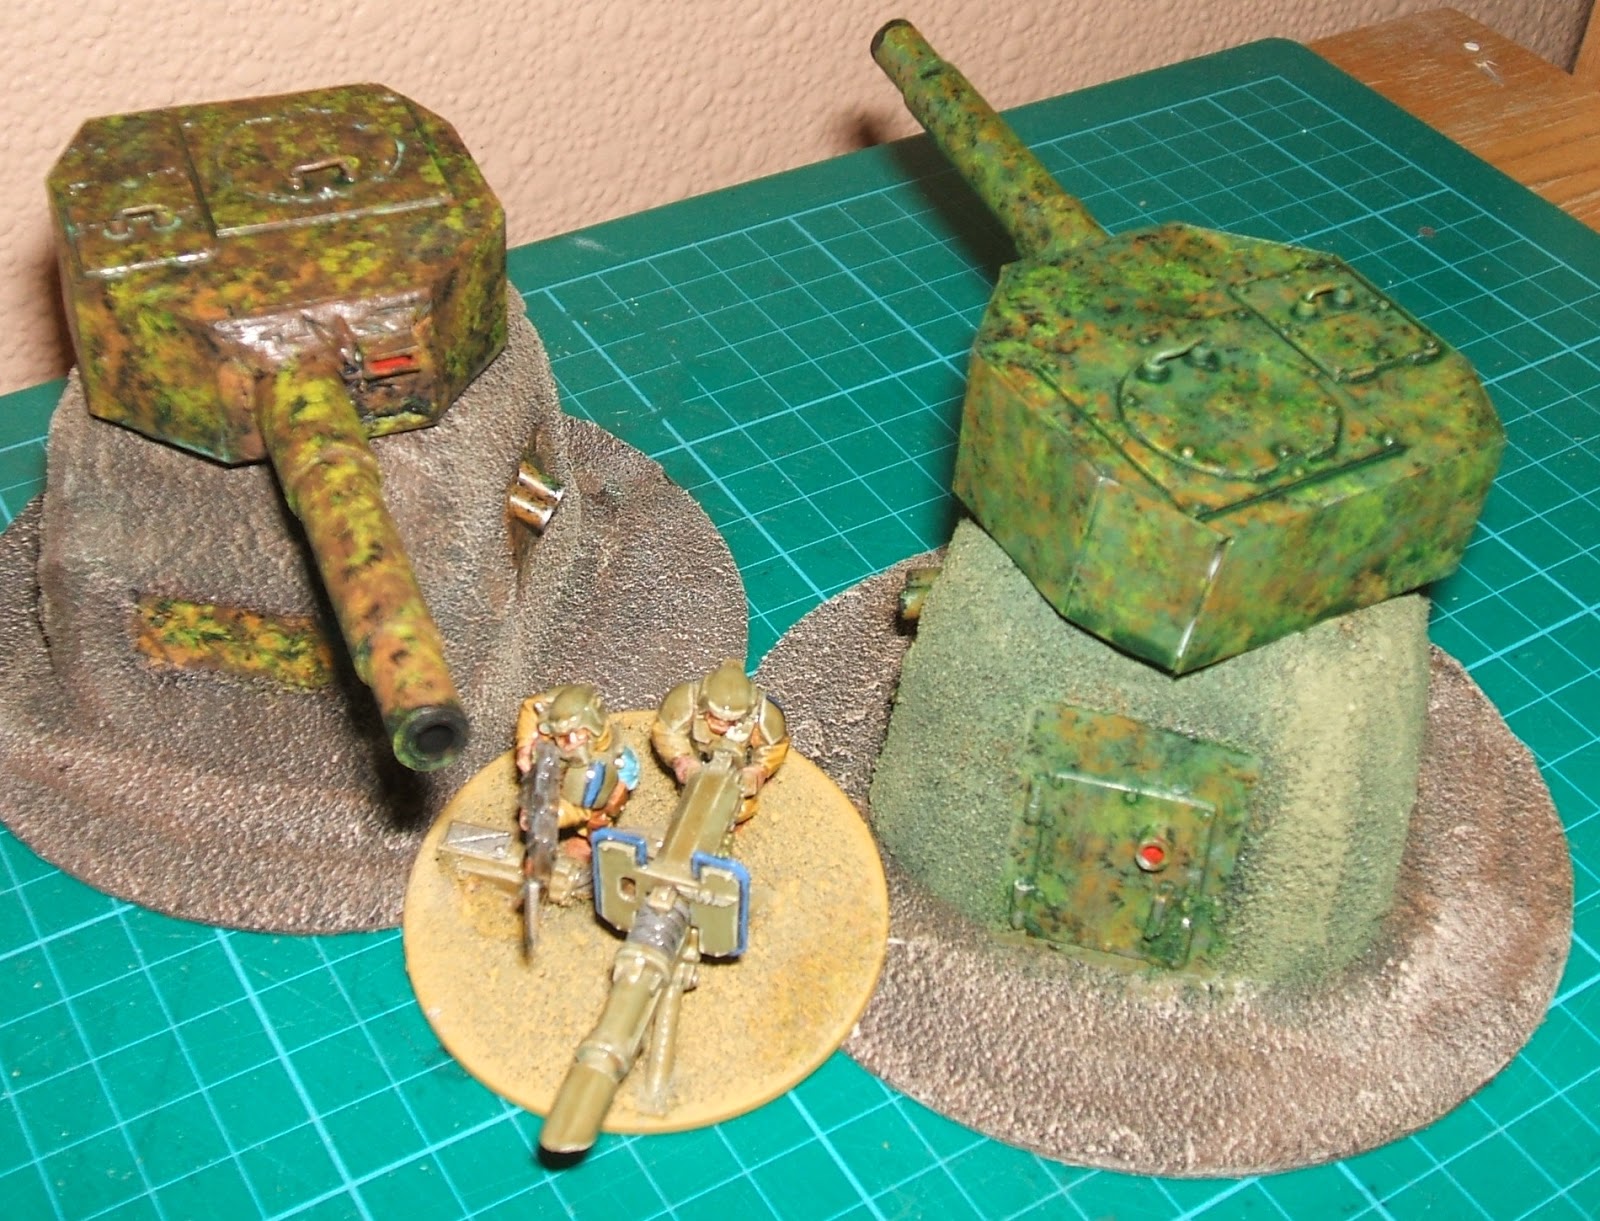
2) These small magnets are fiddly critters, and you must take especial care that they don't end up repelling one another. So test that the right sides will face one another, and attract one another, or you will be in a pickle. Get one magnet and superglue it in place in the middle of the bottom of your tank turret. I tend to build a box around these magnets. Superglue is good, but I don't want the magnet coming loose in thirty years (if the magnets still work in that time!). Take another wee magnet, and put it in the middle of the bottom of your dessert pot. Check they line up, and then glue it in place. Again, I used a hot glue gun to build a box of foamcard around it. See Figs. 1, 2, 3&4.


3) Glue the pot upside down to the base with the hot glue gun. You should be able to place the turret atop this, and it should freely rotate. See Fig. 5.

4) Pop some details on the dessert pot and the base. Just imagine what an emplaced turret would need: ventilation for the crew and engine (something has to rotate that turret), perhaps access panels for machinery, identifying symbols, and most importantly an access hatch. Your turret's crew won't necessarily run from its burning wreckage in your games, but it adds verisimilitude to your universe if the option appears to be there. See Fig. 6&7.


5) Using diluted PVA glue, apply sand all over the structure and base. Wait for this to dry, then apply another coat of PVA glue to lock the sand in place.
6) Paint the structure as desired, and Bob's your uncle! I painted one in greenish tones and another in splotchy browns and yellows. In painting terms, I applied a load of stippling atop a solid base of either green or brown. See Figs. 8&9.


Until next time, folks, happy gaming!
Desiderata:
* Bases
* Hot glue gun and glue sticks
* Wee magnets
* Foamcard or polystyrene foam
* Superglue
* Plasticard or card for detailing
* Paint
* Brushes
* PVA glue
* Sand
* Ruler and pencil
* Short fat yoghurt/dessert pots
* Tank turrets (either home-made or store-bought)
1) Gather your materials. I've got some Alpro soya dessert pots here, specially bought for the occasion. Let it not be said I am not prepared to go the extra (delicious) mile for this blog! ;-)
2) These small magnets are fiddly critters, and you must take especial care that they don't end up repelling one another. So test that the right sides will face one another, and attract one another, or you will be in a pickle. Get one magnet and superglue it in place in the middle of the bottom of your tank turret. I tend to build a box around these magnets. Superglue is good, but I don't want the magnet coming loose in thirty years (if the magnets still work in that time!). Take another wee magnet, and put it in the middle of the bottom of your dessert pot. Check they line up, and then glue it in place. Again, I used a hot glue gun to build a box of foamcard around it. See Figs. 1, 2, 3&4.


3) Glue the pot upside down to the base with the hot glue gun. You should be able to place the turret atop this, and it should freely rotate. See Fig. 5.

4) Pop some details on the dessert pot and the base. Just imagine what an emplaced turret would need: ventilation for the crew and engine (something has to rotate that turret), perhaps access panels for machinery, identifying symbols, and most importantly an access hatch. Your turret's crew won't necessarily run from its burning wreckage in your games, but it adds verisimilitude to your universe if the option appears to be there. See Fig. 6&7.


5) Using diluted PVA glue, apply sand all over the structure and base. Wait for this to dry, then apply another coat of PVA glue to lock the sand in place.
6) Paint the structure as desired, and Bob's your uncle! I painted one in greenish tones and another in splotchy browns and yellows. In painting terms, I applied a load of stippling atop a solid base of either green or brown. See Figs. 8&9.

Until next time, folks, happy gaming!
Subscribe to:
Posts (Atom)