Showing posts with label Star Wars. Show all posts

Saturday, 24 November 2018

Star Wars Ramblings: Tector-class Star Destroyer


I was just reminded of the Tector-class Star Destroyer, and how weird it is, by the excellent YouTube channel EckhartsLadder in this video. I shall quickly place this odd ship in context. The Tector is an Imperial II-class (or Imperator II-class, if you prefer) Star Destroyer variant seen in one shot of Return of the Jedi, and its main distinguishing feature is that it only has a very small ventral hangar bay rather than one capable of containing Princess Leia's corvette. It also seemingly lacks the typical aftward bulb-like protrusion you see on most Star Destroyers.

Star Destroyers typically fulfil a battle-carrier role akin to that of the Battlestar Galactica in the eponymous franchise; they are heavily armed and armoured, and have a considerable fighter wing. Star Destroyers have retrospectively become a very poor design choice. This is due to a number of factors.
 
First, George Lucas did not really think his universe through, and wanted more shiny toys in the Prequels. This led to the odd situation where it's perfectly clear that a single Venator-class Star Destroyer (one of the earlier and weaker ships seen in Revenge of the Sith) carries a large enough fighter wing to overwhelm the defences of a Star Destroyer in the later period. I'd like to note at this point that if you give anyone effectively unlimited funding and carte blanche in their creations, you should not be surprised if things go awry.

Second, game designers and authors followed up on part of what we see in the films, giving players and readers the opportunity to participate in the plucky little fighters attacking these "city-sized" warships. Again, this is perfectly understandable.

However, as I said above, what we end up with is a situation where the notionally more advanced later ships are very much worse than the older ones. A swarm of small fighters can take out one of these large battlewagons in a prolonged fight because the larger ship possesses neither the point defence capability of older, smaller models, nor their fighter capacity, while the swarm carries a number of missile weapons capable of knocking down the target's shields and destroying it. Neither the ship's armour, nor its shields are capable of resisting this swarm attack. The vessels' ability to carry about 10,000 troops does not justify this odd situation. Truly, Star Destroyers have retrospectively becomes jacks of all trades, and masters of none.

There is the context. Into this milieu the Tector-class Star Destroyer is introduced. The ship lacks the aftward ventral bulb that distinguishes the Imperial and Imperial II classes. It's reasonable to infer that this means that she is more heavily armoured. The ship's reactor (which is what the bulb is) is more heavily protected in the ship's innards. The vessel also lacks significant ventral hangar bays, and other sources have clarified that this is not made up for by the provision of replacement hangar bays dorsally or on either flank. I'm not even sure, from what we see, that the ship is capable of launching or receiving Lambda-class shuttles. I am happy to be corrected.

The ship lacks the fighter protection enjoyed by its close relatives, sacrificing it for armour and shileding that, we have established, are not sturdy defences in-universe. Moreover, it sacrifices another of the Star Destroyer's typical roles: planetary invasion or the ability to put boots on the ground. Without a large hangar, there is no way to launch the mammoth four-legged AT-ATs, the companion two-legged AT-STs or "chicken walkers", or even large contingents of infantry.

What is this thing for? Typical Star Destroyers of the I-line have a crew of c.37,000 and pack in another 10,000 soldiers. I'm going with the figures of my youth, so bear with me if the canon has changed. I was surprised earlier to see that Interdictor-class cruisers are now 900 metres in length. They were 600 once. Anyway, this ship certainly doesn't need that many Stormtroopers and vehicles if it can't get them out. The sources suggest that this design of vessel superseded the Venator because it was sturdier, which is a terrible argument. It is more specialised for capital ship combat, ignoring the vital fighter element, and is incapable of effecting a planetary invasion.

My best justification for this ship is that it is a taskforce or fleet flagship. Extracting ten thousand men lets you put in all sorts of communications goodies, and with the additional armour, the ship can survive longer in combat, decreasing command and control problems. Frankly, that's not a great justification. It's a Star Destroyer, so it's already very difficult to destroy, and in a ship that's a mile long, you can probably find a couple of rooms to jam in all the personnel you need to coordinate a fleet.

That's the Tector-class, folks. It's a ship that doesn't really make sense in a place where ships don't really make sense. Perhaps surprisingly, given how exactingly I've taken it to task for its deficiencies, I rather like it!

Links:
http://starwars.wikia.com/wiki/Tector-class_Star_Destroyer
http://starwars.wikia.com/wiki/Tector-class_Star_Destroyer/Legends

Monday, 20 August 2018

Space table

A long time ago in a blog not terribly far away, I painted a table tennis table so it provided a (nearly) 4' by 8' playing area for space battles. That's great but not portable. Ergo, meet the new table, smaller than the old table. This is 3' square, and was quite fun to construct. Show me someone who dislikes sawing up bits of wood and I'll look at them funny. I hope the pictures speak for themselves. A spot of glue plus some weight plus clamps plus time = the skeleton. Add a grey undercoat, a black gloss base, and then some gentle sprays with spraycans.


Monday, 30 July 2018

Star Wars: Legion

A few shots here of some models I undercoated for a friend at the club, and of some I bought for myself when the Star Wars itch became too strong! I ought have paid more mind to the sergeant's pose, for he has already been christened Sergeant Shakespeare by my mates.


Wednesday, 28 December 2016

The Force Will Be With You. Always.

Farewell to a wonderful lady. As an actress a delight - from gunning down Stormtroopers to telling off Bruce Dern like he was a a little boy. As someone who worked hard to take the stigma away from mental illness a champion. A brave woman, but none of us live forever. May the Force be with you, Princess.


Monday, 26 December 2016

Wednesday, 2 November 2016

Ruined adobe buildings for 28mm

Intention


Having made a bunch of adobe buildings for Middle Eastern/American/SF use, I wanted to round them out with a few abandoned ruined structures. Maybe the settlement fell on hard times as a result of the depredations of Space Calvera. Perhaps, as was formerly the case in Greece, incomplete buildings are not taxed. It used to be quite a striking feature of Greece, that: perfectly habitable (and inhabited) buildings with a notionally incomplete upper floor. Hardly the Parthenon, I agree.

Beginnings


I carved a few bases from cake board (£1 from my local pound shop), two small buildings and one mid-sized. I bevelled the edges, and coated them with a layer of UHU. Not coating them would have meant they'd have been warped later on. With some polystyrene offcuts and some foamboard, I created the perimeters of the buildings, gluing everything together with the hot glue gun. I put in a little rubble (not enough to impede the occupation of the buildings by soldiery) and something in the way of tall grass. I coated this all with dilute filler (hence the earlier application of UHU to the bevelled edges).

Painting


I applied a coat of the same cream paint I've been using since c. 2003, and suddenly realised I was on the brink of running out. Improvisation! So I applied some dilute washes of brown and black around the edges of the walls and on the walls themselves. Once they were dry, I began drybrushing the walls in progressively lighter shades, working my way up to white.

Finishing Touches


With the painting completed, I went a bit crazy with the flock. These dwellings were clearly abandoned a while back as the greenery (and brownery) suggests. I'm pleased with how these turned out, particularly the very exposed vantage point at the top of the stairs. Now I just need to find some paint to last me the next decade and a quarter.


Saturday, 1 October 2016

The Empire Needs You!


I was in Wales the other month, and chanced on a new gaming store in Swansea. Naturally, I couldn't resist picking up some Stormtroopers, though I managed to resist the siren song of Imperial Assault itself. It's just a matter of time before my resistance is crushed, mind you. They are lovely little models. A minimum of mould lines. It's a shame there is only the one pose, but when I get some more, it'll give me incentive to get out sharp implements to perform a spot of battlefield surgery. They aren't 28mm, as I had suspected (or known?), but are similar enough in size to the larger 28s that they can stand (in their crouched pose) beside them without too much bother.

In the comparison shots are a tall chap from Renegade's 28mm WWI range and a wee Scots officer from Musketeer's 25mm range. I undercoated the Stormies white, gave them a wash of that Nuln Oil black wash, dry-brushed the armour white again, and picked out the recessed details in black. The bases got a dark grey, and then the whole model received a gloss varnish, resulting in the floors resembling those of the Death Star. I did experiment with some ruddy shading for the eyes, but it hasn't worked. I must bear in mind that one needs greater contrast with little things.


Friday, 4 March 2016

Terrain Tutorial: Build your own village

Nothing could be simpler than knocking up an adobe village. Even better, provided you minimise the detailing, they're suitable for all sorts of locations: the Middle East, Mexico and the south-easterly portions of the USA, even the desert planet Tatooine.

Requirements:
Foamcard
Long pins
PVA glue
Superglue
Balsa wood
Rulers
Pencil
Sharp knife
Suitable paints
Paintbrushes, including a quite large one (a 1" brush is a good size)
Filler

Decide how large you want your buildings to be. I decided to give most of mine a 3" (76mm) by 3" footprint on the table, and then make a few slightly larger ones for variety. I drew some 1:1 plans on an A4 pad (Fig. 1) and set to work. I carved out all the side pieces (leaving out the roofs for now), including doors, which I decided would be an inch (25mm) wide and an inch and a half (38mm) high. Owing to the size of the buildings, I elected to have windows on doors on different walls. I also marked out one inch from the top of the walls so I could place the roof there later (Figs. 2-4). After construction, I ran across another tutorial which recommended carving out a 5mm strip at the end of the wall, allowing pieces to abut very tidily. I have since tried it and commend it to you. It means less work when applying filler to hide the joins later.

When carving out your doors and windows, do not throw away the offcuts. Retain them. Line up your corners, painting some PVA on the adjoining segments, and then pin them together. Do not worry if the pieces are of slightly different heights, but do your best to ensure that the bottoms of the walls are level so that the completed dwellings will sit flat on your table. Once the walls are pinned together, take those offcuts you saved, and pin them into three corners of every four, where they will support the floor you will add later (Figs. 5 & 6).

I chose to make two slightly larger and different buildings here to add to the character of the settlement. I gave one a 4" (102mm) long back wall, and the other a 4" (102mm) long front and 5" (127mm) long back wall. In both cases I cut a strip of 1" (25mm) wide foamcard and then cut it into pieces to form an external staircase. I recommend decreasing the strips of steps as they are stacked by 1/4" (6mm) for a good appearance, e.g. if the lowest strip was 76mm long, the second should be 70mm, and so on. As before, apply PVA glue and secure the pieces with pins (Figs.7 & 8).

Let everything dry overnight, then remove the pins. Twist them through a complete circle in order to break the glue's hold on them so you can remove them easily. Round off the sharp edges of the buildings with a sharp knife. Create some damaged sections for verisimilitude. Remove some of the paper covering, and carve bricks into the exposed foam. Make some roofs to fit the buildings, and carve a 20mm by 20mm square close to one corner unless the building has an external staircase. As before, glue and pin in place, leave to dry, and remove the pins when dry (Figs. 9-11).

Mark on balsa sheet your doors, windows. Remember to make them large enough to overlap the door-frames and windows. Using a ruler and pencil, score them to suggest planking (you may need to repeat this after staining), then dye them with diluted paints. This gives an initial suggestion that the wood is sun-bleached (Fig. 12). I chose to stain each building's wood differently. Do not worry if some pieces are more strongly stained than others as it is what happens in reality. Once dry drybrush with a colour to suggest the wood is weather-beaten. I used a cream.

Mix up some filler and apply it with the large brush across the building to provide some texture, taking care not to obscure the brick detail you have scribed in place. Once this has dried, repeat the procedure, applying the filler only on the pieces of wall not scribed with brickwork. Wait for this to dry, then paint the buildings in your choice of colours. I mixed a brown with a cream, and used that for my base coat. I applied a heavy drybrush of cream over that, and a final lighter drybrush of white. Some of the filler had dripped into the buildings, so I carefully removed that at that point. Then I applied superglue around the insides of the doorways, windows and roof hatches, and glued the differently stained and drybrushed woods in place.

And you're done! Enjoy your village. Note in Figs. 9-11 the larger building with the domed roof. Look out for a feature on that building shortly. The general principles are similar to these buildings.


Saturday, 9 August 2014

Fantasy Flight Games - Star Wars: Armada

Last night, as I write this, I just received the best news ever. In addition to X-Wing, which deals with fighter combat in the Star Was universe, FFG are set to release a capital ship combat game in early 2015. I have been wanting and waiting for an official SW capship game since I read Timothy Zahn's first Thrawn book in the nineties, so more than half my life. This is the most exciting hobby news I have heard in an age. Announcement here. The initial look of the box is three pre-painted capital ships (Imperial Victory-class Star Destroyer, presumably Rebel Nebulon-B Frigate and Corellian Corvette) with some unpainted fighters denoting squadrons. Squinting at the display of contents, I can make out cards for Grand Moff Tarkin and General Dodonna, a character in white with an Imperial Naval Trooper behind him (so perhaps Yularen of Intelligence), a woman in front of what seems to be an Imperial-style window (so possibly Daala or Isard), and a load of cards I can't identify. If these cards are the same size as those used for FFG's X-Wing game, enterprising folks should be ale to get a idea of the size of the VSD and other modes. The scale of the capital ships looks a bit inconsistent to me. I wouldn't expect the fighters to be to scale, as they'd be fighting angels for room on the head of a pin. This may be inevitable, as the iconic corvette is only one sixth as long as this small Star Destroyer (and only half the length of the Nebulon-B) if rendered in the same scale. We'll see. Anyway, may the Force be with you, folks!

Monday, 26 May 2014

X-Wing: repainted Micromachines

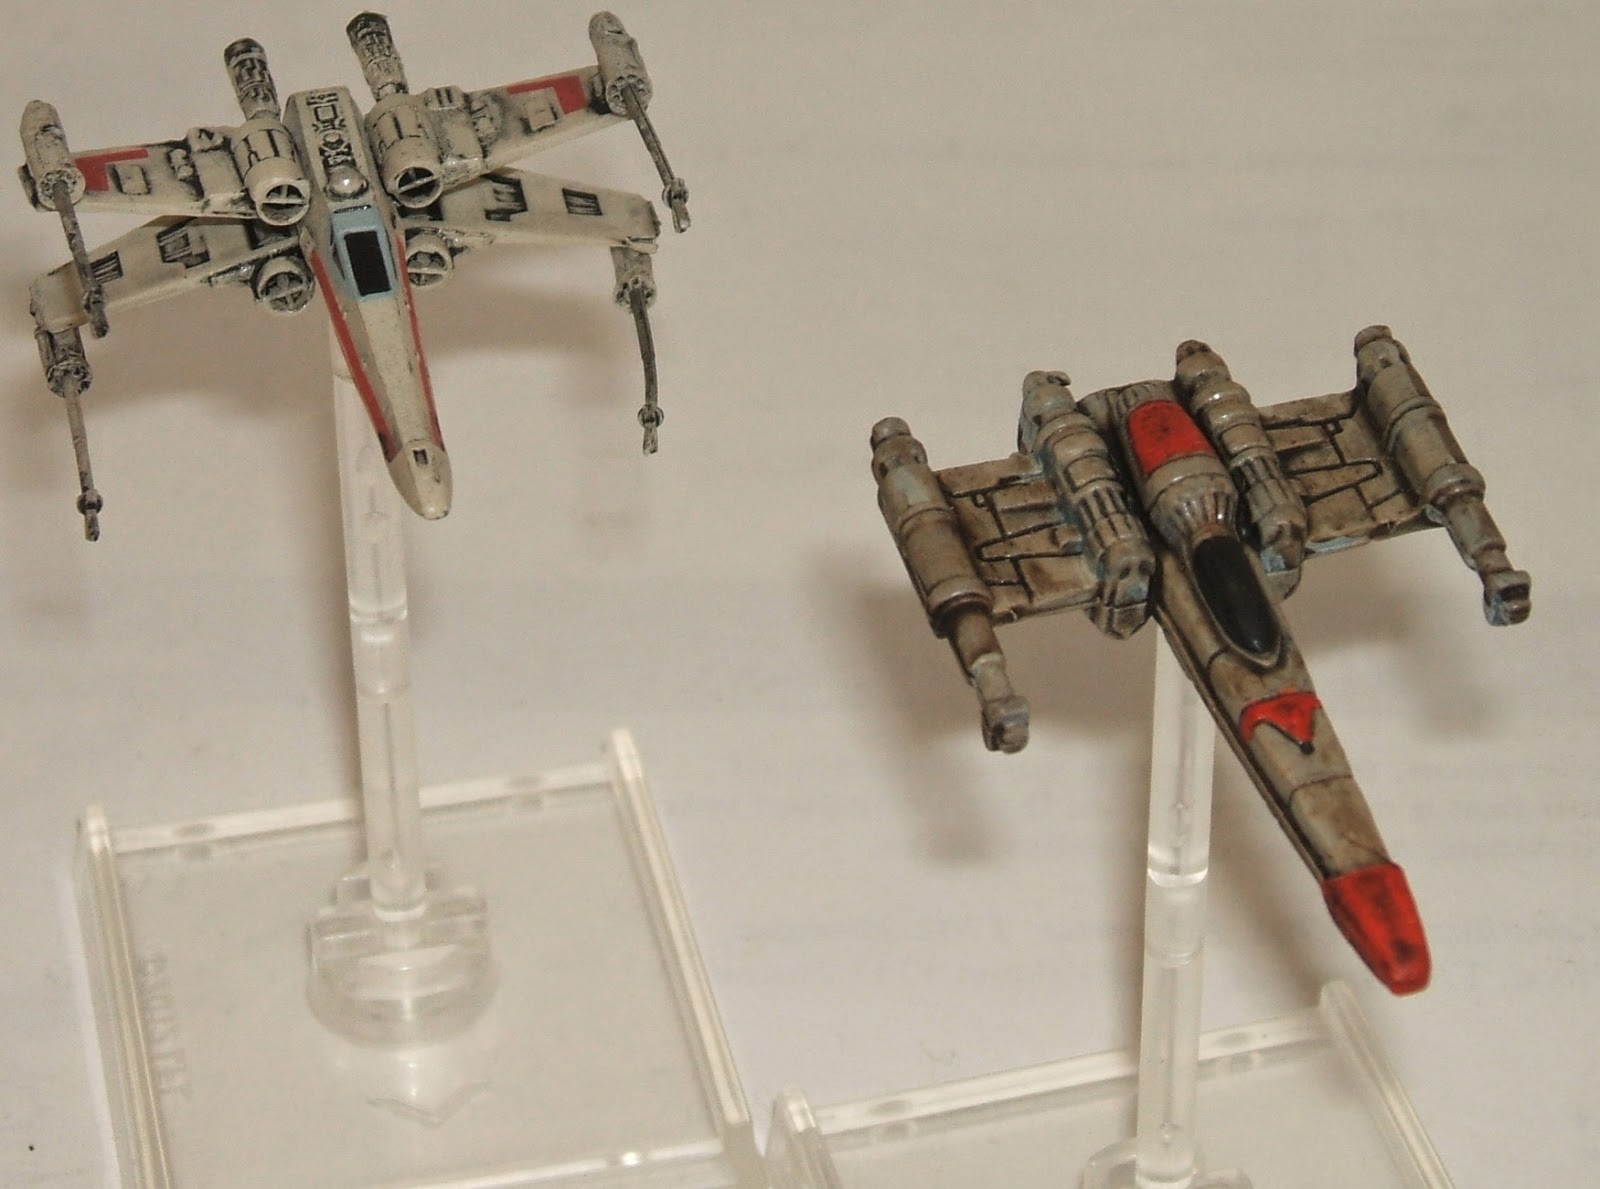
I finally got round to playing X-Wing the other week. Some friends and I played the simple starter version - no complicated gaming when booze is involved! It inspired me to dig out some of my old Micromachines and have a crack at repainting them. Not to toot my own horn, but they've come out most satisfactorily. The Empire is now strengthened by an Interceptor, a technological terror to augment their two TIEs. Perversely, the Rebel X-Wing is now supported by her design's predecessor, the Z-95 Headhunter. Paint-wise, they all received a dark grey undercoat before I began work. The Squint (as anyone who's read the X-Wing books will know the Interceptor) received progressively lighter drybrushes of grey, then some black on the cockpit windows and wing panels to finish them off.

The Z-95 (did they merit a nickname in the X-Wing books?) again had progressively lighter greys drybrushed on, but then I switched to shades of khaki instead. A few spots had a coat of orange, which I then painted scarlet over. I then washed the whole fighter with some Agrax Earthshade, after which I repainted the cockpit window black. Finally, there's a Skipray Blastboat, which, memory tells me, and the Star Wars Wiki confirms, could help either side out. Like the TIE she also had progressively lighter drybrushes, then a few carefully applied spot of green, some black for the windows, a few spots of white, and a wash of Agrax Earthshade all over, giving her something of an intermediate look. I'll have to sort out some stats and bases for these guys for the next time I have a game. Here they are for now with the original models for comparison.


Related Posts Plugin for WordPress, Blogger...