Showing posts with label Bunkers. Show all posts

Monday, 7 August 2017

Bunker

Just a little bunker today. I finally got the roof finished last night, long after the main body, so pardon the difference in colours between the two. Unlike previous bunkers, this one isn't designed with 40K Heavy Weapon teams in mind. It has a bit more of a historical feel to it.


Monday, 5 December 2016

Retro Monday #2: a bunker fit for your 40K squad

Carrying on with what I hope will be a popular retrotastic addition to the blog, here is the second of our Retro Monday features: a bunker fit for your 40K squad. Last week we featured the teeny version of this, which houses just a Heavy Weapons team (or something with a similar footprint). This week, quake at the majesty of the large version, which could hold something like a platoon of Guardsmen, if you squeezed 'em in real tight.

Monday, 28 November 2016

Retro Monday #1: Simpler Mini Bunkers for 40K

I fancy starting a new feature on this blog. In a word, I will unearth popular posts from the past, and shine a fresh spotlight on them. This first one is the most popular post I have created thus far in the whole blog. I was pleasantly surprised to find it on Pinterest some time ago. Without further ado, I present to you Simpler Mini Bunkers for 40K.


Monday, 24 February 2014

Terrain: Mini-Bunkers

I have a bunch of little bunkers sat about, assembled and undercoated in black, but unpainted and roofless. So I pulled out three shades of grey and successively drybrushed the walls of the buildings. For reference, I used the following paints. Dark: Mechanicus Standard Grey, Medium: Dawnstone, and light: Celestra Grey. Then I painted the doors with a coat or two of an old pot of Brazen Brass, and splotched a bit of Mithril Silver over that, and picked out the buttons to control the doors with Ultramarines Blue (probably - it's been moved to a modern pot). The above are all GW paints. Then I drybrushed the ground with some Galeria Acrylic Raw Umber, then a second layer of Boldmere Acrylic Burnt Sienna.

I left it to dry, then used dilute PVA to affix some grass to the surface. I'll probably hit that with a drybrush to take the brightness off it. At some point I'll get round to making roofs for these things, but there's no rush. Who needs ten bunkers capable of holding a Heavy Weapons team or five individual soldiers? Not I. I might see if I can sell a few of these to my old wargaming club later this year. I am toying with popping down for Old Boys' Week for the first time in - well, I never! - a decade. That's a bit weird. Anyway, before I ramble off down Memory Lane, here are some shots with Mr Sherlock Holmes investigating some bunkers placed very oddly.


Thursday, 26 September 2013

Thirty painted bunkers for sale at £15 each!

I've sorted out my troubles with Ebay. Here's the listing for the bunkers. They're £15 each with free P&P in the UK. I hope you like them enough to buy one!

Sunday, 22 September 2013

Bunker for sale

One of the bitter-sweet things about life is learning. Usually, learning is helpful in the long-term. Sometimes it's a bit of a pain in the short-term. I have got 32 bunkers ready to sell. So off to Ebay. I haven't ever tried to sell 32 of something before. I put up one listing, and can't work out how to sell multiple iterations of the same thing in that one listing. I know it's possible. I've seen it done. So I had a rant on Facebook, and a friend kindly provided me a link. After some swearing, the link was useful. Isn't it amazing how swearing makes things work out? Unfortunately, when I tried to sell 30 items . . . Ebay told me I could only sell 30 items per month. So I asked it to post me a letter. Then I tried to edit the listing so I could sell 29 items on the big listing. But now all that happens is that it sends me back to the sign-in screen. It's fine. It isn't as though I need to sell these bunkers so I can afford to pay off the minimum payment on next month's credit card statement, meaning any delay would be excruciating. Oh, tell a lie.

Anyway, if anyone fancies bidding on the one item Ebay is allowing me to sell for the time being, here is the first bunker. The number of these things is slowly creeping upwards. I might end up selling 150 of them by the end of it all. If I can afford to. I have also been working on a load of those mini-bunkers. I'd rather sell them in pairs, but trios would arguably make more sense, so you could fit a whole Heavy Weapons Squad in them. What do you folk think? Please comment below. For the time being, here are the illustrative pictures of the bunkers I hope soon to be able to sell on Ebay en masse. As the Ebay blurb suggests, I suspect they'll mainly appeal to 40K Apocalypse players, but a bunker or three would sit nicely on a normal table as an objective or narrative terrain feature. Heck, on a 6' wide table, three of these bunkers (each a little less than 6" wide), would provide a pretty coherent defensive line across the whole board. Go on. you know you want to. Fully painted. You can just pop them right on the board. Game with them right away. Ugh, I hate sales patter. I disgust myself. Let's pass over this ugly incident with a few pretty pictures of a specimen bunker.


Friday, 30 August 2013

Bunkers upon bunkers upon bunkers

I have spent much of the last few weeks making bunkers. I'm planning on popping them up en masse on Ebay once I'm well into the construction process, which is fairly close to where I am currently. This sounds surprising until I tell you I have 135 vegan ice-cream tubs to turn into bunkers. We don't throw things away in this family! So I bought three big sheets of 5mm foamcard, and got to cutting. I already cut vision slits in seven of the eight sides of the bunkers, and have been gluing slices of foamcard to them, and re-making the vision slits again. Anyway, this is going to be eating up a lot of time for a while yet, but if anyone fancies themselves a bunker, keep your eyes on this blog. Here's a pile of semi-constructed bunkers for your delight.


Monday, 25 March 2013

Terrain Tutorial: Rotating Field Gun in a Bunker

First, catch your hare, as I understand Mrs Beeton once wrote.

Desiderata:

* Hot glue gun and glue sticks
* Sand
* PVA glue
* Paint and brushes
* Various sizes of plastic tube (you'll want something thick enough to make the barrel of a tank's gun in your chosen universe)
* Plasticard sheet
* Foamcard
* Basing material

1) Gather your bits and bobs together. It's always a great idea to have everything to hand. See Fig. 1.


2) Cut a strip of 40mm foamcard. This will be the sides of your building. Mark out on your base the diameters of your building, and cut the lengths of this to that scheme. The front should have a gap for the gun to point out and threaten your foes. I made a 15mm gap in the frontage to allow the gun to point out. Knock up a gun from various diameters of plasticard tube. See Fig. .2.


3) Assemble the walls of your bunker with the hot glue gun. Since my base was triangular, so is the bunker. So adapt your bunker to the shape of your base. Knock up a door from pieces of plasticard or card, and glue that to the back of the building. See Figs. 3&4.


4) Get two diameters of plasticard tube, one one of which fits around the other, and glue the thinner one in the middle of your bunker. Note it can be tricky to get a long gun into your bunkr latr, so I recommend slipping it in at this point. See Figs. 5&6.


5) Glue your gun to the thicker tube, which should fit nicely around the thinner one. See Fig. 7. Ensure it rotates freely. See Fig. 8.


6) Paint the interior of the bunker black now. You will glue a roof on the bunker shortly, after which point reaching the innards will be a bother! See Fig. 9.


7) Glue a roof atop the bunker. See Fig. 10.


8) Apply a layer of dilute PVA over the whole of the model except the gun and door, and liberally apply sand. Once this has dried, apply another layer of dilute PVA across it all.

9) Paint the model as desired. See Figs. 11&12.


Happy gaming, folks!

Wednesday, 13 February 2013

Terrain Compendium: Hold until relieved!

I have recently posted quite a few tutorials, which have mainly covered how to build pretty simple defensive structures. It strikes me that the best thing to do when so many articles have been posted is to collect them all in one handy location. Today's post is a compendium of these recent terrain tutorials. This is a one-stop-shop of bunkers and ramparts, folks! If you want to avoid being overrun, leaf through the following.

First up is a pair of ways to build miniature bunkers. These are adorable little things which fit on a CD and will hold either a single Imperial Guard Heavy Weapon Team or 5 or 6 individual models. The first is for those of you with a few lumps of spare plasticard about, and the second is for you folks with foamcard in abundance. Actually, even foamcard in short supply will do. These bunkers really are tiny!

If you fancy a larger bunker, one capable of containing a whole squad of Guardsmen (or even a whole Heavy Weapons Squad), then this is the tutorial for you. For variations on that theme, check out this entry, which offers some alternative (or alternate, if you're an American reader) configurations which might offer you some advantages in battle.

At the lower end of the technology scale, check out this design for earthworks. It's a design which you can easily scale up to protect a larger unit, or just provides a nice, simple defensive structure for a single HW Team or 5-6 infantry models. Then there's this really simple obstruction-cum-defensive structure: the wooden fence. Hide behind it. Retard or channel the advance of enemy infantry. The options are endle- well, pretty limited, actually. But it's great for those pre-industrial games, and you modern era guys will love running a tank over it and demanding it be removed from the board. If there's one thing PC games have taught us it is that everybody loves deformable terrain!

If you'd like to hold up enem vehicles with a spot of difficult terrain, then check out these tank traps. Alternatively, try out this really, really simple version of tank obstacles.

Here are a few bonus pictures of things I have been working on. I mentioned above the mini-bunkers. I completed most of these to hold HW Teams in comfort, but who doesn't want a ruin? They're handy to represent the building the enemy shot up last turn, an abandoned construction, or just a bit of incomplete or substandard workmanship. Er, on the part of the army's engineers. I always meant it to look that way. I didn't just lazily give up halfway through. Ahem!


Wednesday, 6 February 2013

Terrain Tutorial: Simpler Mini Bunkers for 40K

Some time ago I offered up a tutorial on mini bunkers which can enclose a single HW Team. I noticed two things about them that could be improved on. First, they relied on a store of plasticard, and on laminating it. So this has been replaced  with foamcard, which is easier to cut to shape. Second, they were designed only with Imperial Guard models in mind. I realised that just adding a little height would allow them to be used for taller miniatures, such as Space Marines toting Missile Launchers, opening up a wider vista of opportunities for these little fellas. So now they are more versatile! Ever the recycler, I have re-used some pictures and text from the earlier tutorial. Here's how you make the simpler bunkers.

* Plasticard sheet (0.5mm thickness)
* Plasticard rod (of whichever size you feel best suits buttons, rivets and door-hinges)
* Polystyrene cement
* Cardboard
* Foamcard (5mm thickness)
* Green Stuff or Milliput
* Superglue
* Sand
* Paint
* PVA glue
* Spare CDs or other things to use as bases
* Hot glue gun and sticks
* Ruler
* Pencil
* Knife

1) Grab yourself a bit of cardboard. A cereal box would be fine. Mark yourself a square with sides of 3" (75mm), and cut it out. Find the midpoint of each side, mark half an inch (12.5mm) either side of this, so that there is an inch (25mm) marked in the middle of each side. Trace lines between these so as to create a slightly irregular octagon. Cut along these lines to create such an octagon. Using superglue, secure this template to the centre of your CD, remembering not to put glue where the hole will be, accidentally gluing it to your work surface! For a plan see Fig. 1, and see Fig. 2 for the cardboard glued in place.

2) Cut a strip of foamcard that is 45mm across. If you want a taller bunker, just increase this measurement. Cut three 25mm strips. See Fig. 3.

3) Using the hot glue gun, glue the three strips to the perimeter of your card template and try to ensure they set in a vertical position. Then trim some more pieces of the foamcard to slightly longer than the gaps between them, and dry-fit them in place. Trim them to size with your knife, and then use the hot glue gun to secure them. For the front of the bunker, do not add the very front wall until last. First make your rough cuts of the front left and front right sides. You should have an angular C-shape and reversed shape. The bottom of the C should be 14mm, the top and side 10mm. Glue them in place with the hot glue gun. See Fig. 4.

4) Cut a couple of pieces of foamcard to fill the gaps in the front of the building, and with the hot glue gun, secure them in place. See Fig. 5. Now trim down the odd protrusions and smooth out the sides of the bunker as much as you can with your knife. Cutting a lot of foamcore may blunt it, so do change the blade if you need to. Now you can, if you, like, add a layer of 0.5mm-thick plasticard around the outside (and inside) of the bunker, and fill in any empty spots with GS or Milliput. I only had GS at the time. See Fig. 6.

5) Now use a bit of plasticard and knock up a door for the back of the bunker. Apply rivets and a handle or control panel and superglue it in place. See Fig. 7. You can compare the two different designs of bunker in Fig 8. The walls of this newer bunker are a bit thicker, as you can see. Turn the bunker upside down on a sheet of foamcard, and trace around itsedges. Carefully cut this shape out of the foamcard, trim it a little, and you should have a perfectly fitting roof.

6) Now grab a  load of sand and some slightly diluted PVA glue. Apply the PVA liberally to the bunker, and to the roof, and apply sand atop this. Remember to scrape off any sand that gunks up the door. Wait for this to dry, then apply a coat of dilute PVA over the top of it for it to dry. Then undercoat as you wish, and set to painting. See Figs. 9 & 10.

Some of the pictures below are out of numerical order. Blogger seems to enjoy doing this. Attempts to move them always result in a mess. They are labelled with the correct numbers, so you shan't get too lost! Happy gaming, folks!


Monday, 4 February 2013

Terrain Feature: Bunker Variations

Hey up, folks. The other day I promised you some variations on the "bunker fit for a squad". There are three varieties of bunker here. All of them share a common feature: I trimmed off the top of the plastic tub, which is a thin lip that rests on the gaming table otherwise. The first of these is a modification of the original Squad Bunker. As I mentioned in that tutorial, you might get opponents raising eyebrows about LOS from any HW Teams in the building, as the guns cannot poke out the openings. This version of the bunker solves that problem, not having vision slits so much as gaping holes out of which regular infantry models and HW Teams can both draw LOS to models outside. As well as this, I have painted this model so it seems to fit a "Red Planet" theme. Anyway, see Fig. 1-3.

The second and third versions are both designed with HW Squads in mind. For both of these the foamcard is glued on externally, leaving enough space within for three HW Team bases. If the foamcard were applied internally, there just would not be enough room. Anyway, one is modelled to allow the HW Squad to have one gun of the Heavy Weapon Squad pointing out to cover most of the approaches to the bunker See Figs. 4 & 5. To be honest, I am not sure how LOS works in the current incarnation of 40K, so this might not be that helpful. But if that is so, then the third iteration is the one you want. I have carved out the front of the bunker, creating a "vision slit" which gives the three HW bases excellent forward LOS and pretty good side ones, too. If you have enemy coming at you from the font and simultaneously sweeping around your sides, this is the version you want to give your HW Squad the best protection while allowing the best field of fire. See Figs 6-9.


Stay tuned for more terrain updates, folks!


Thursday, 31 January 2013

Terrain Tutorial: a bunker fit for your 40K squad

Let's get down to brass tacks. First, grab yourself a suitably shaped container. The best thing I have yet found for bunkers for 40K is Swedish Glace's vegan ice-cream tubs (see Fig. 1), so that is what I am using here. With minimal alterations, these instructions will probably work with whatever plastic containers you have to hand.

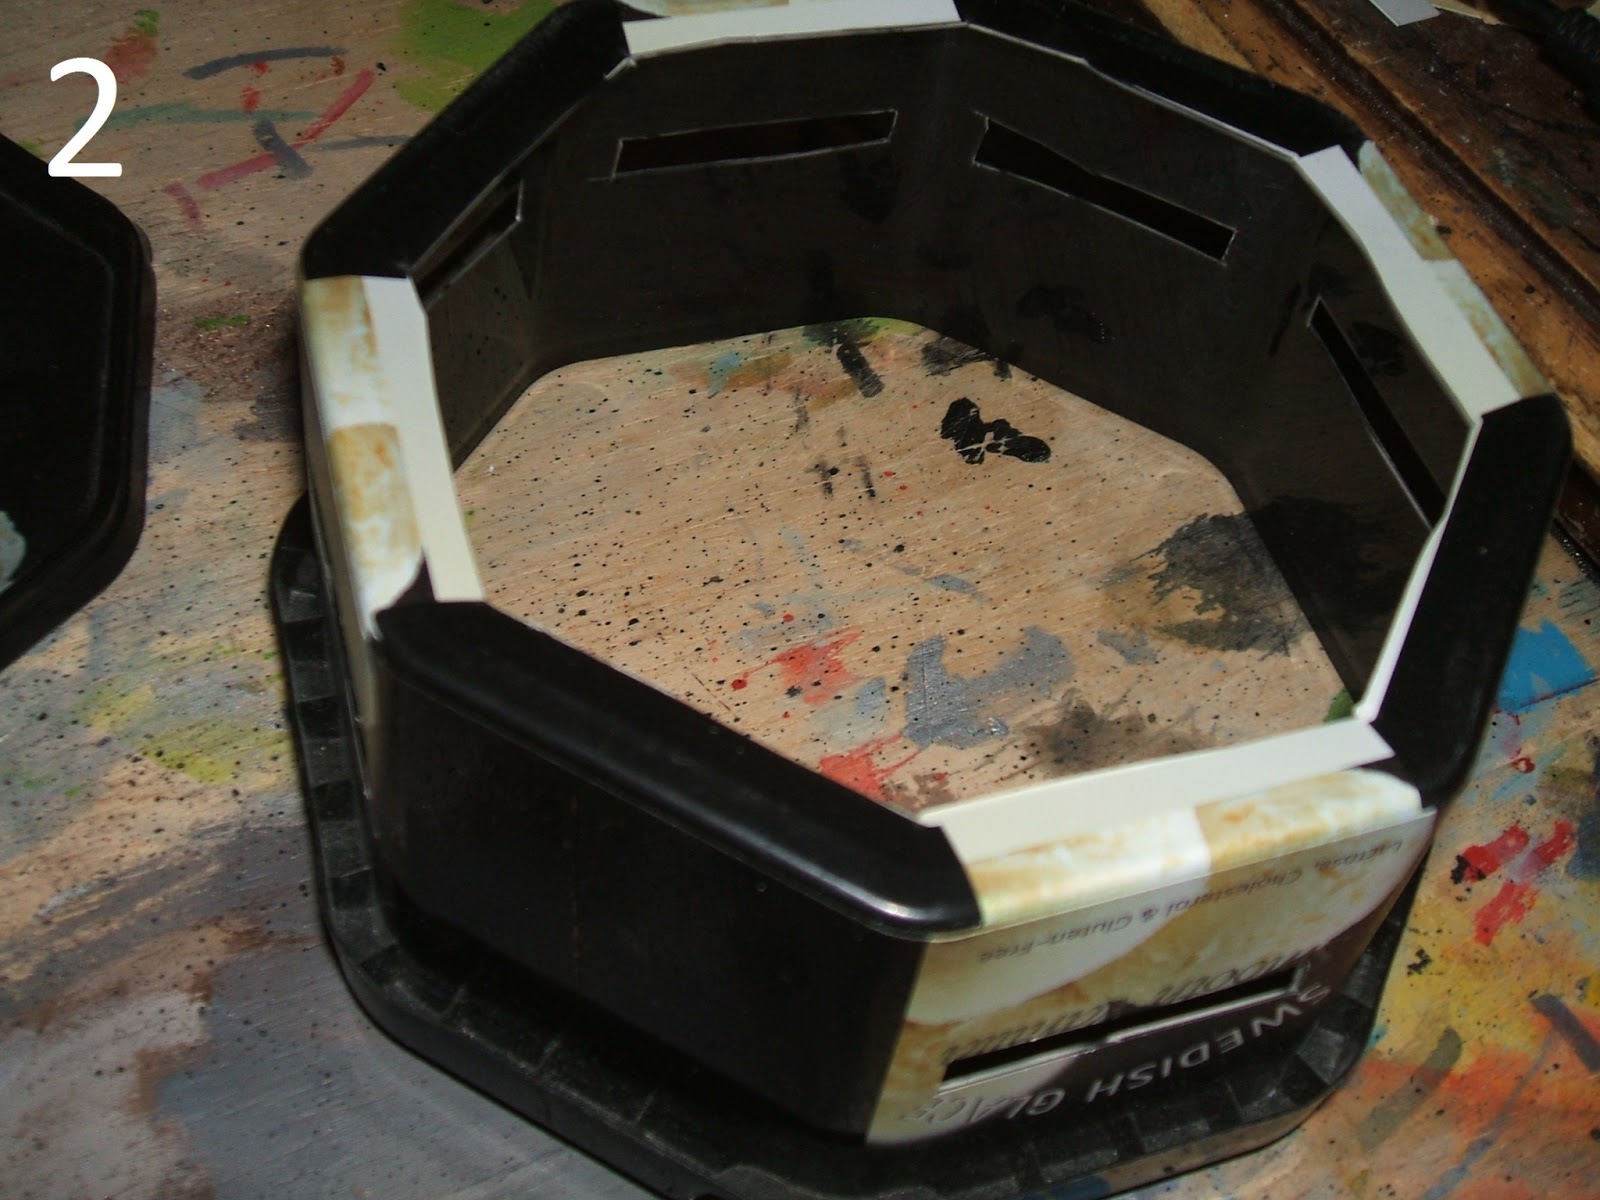
1) Cut away the bottom of the container, and carve vision slits into the sides of the container. This sort of plastic is flimsy, so be careful not to gouge yourself. See Fig. 2.
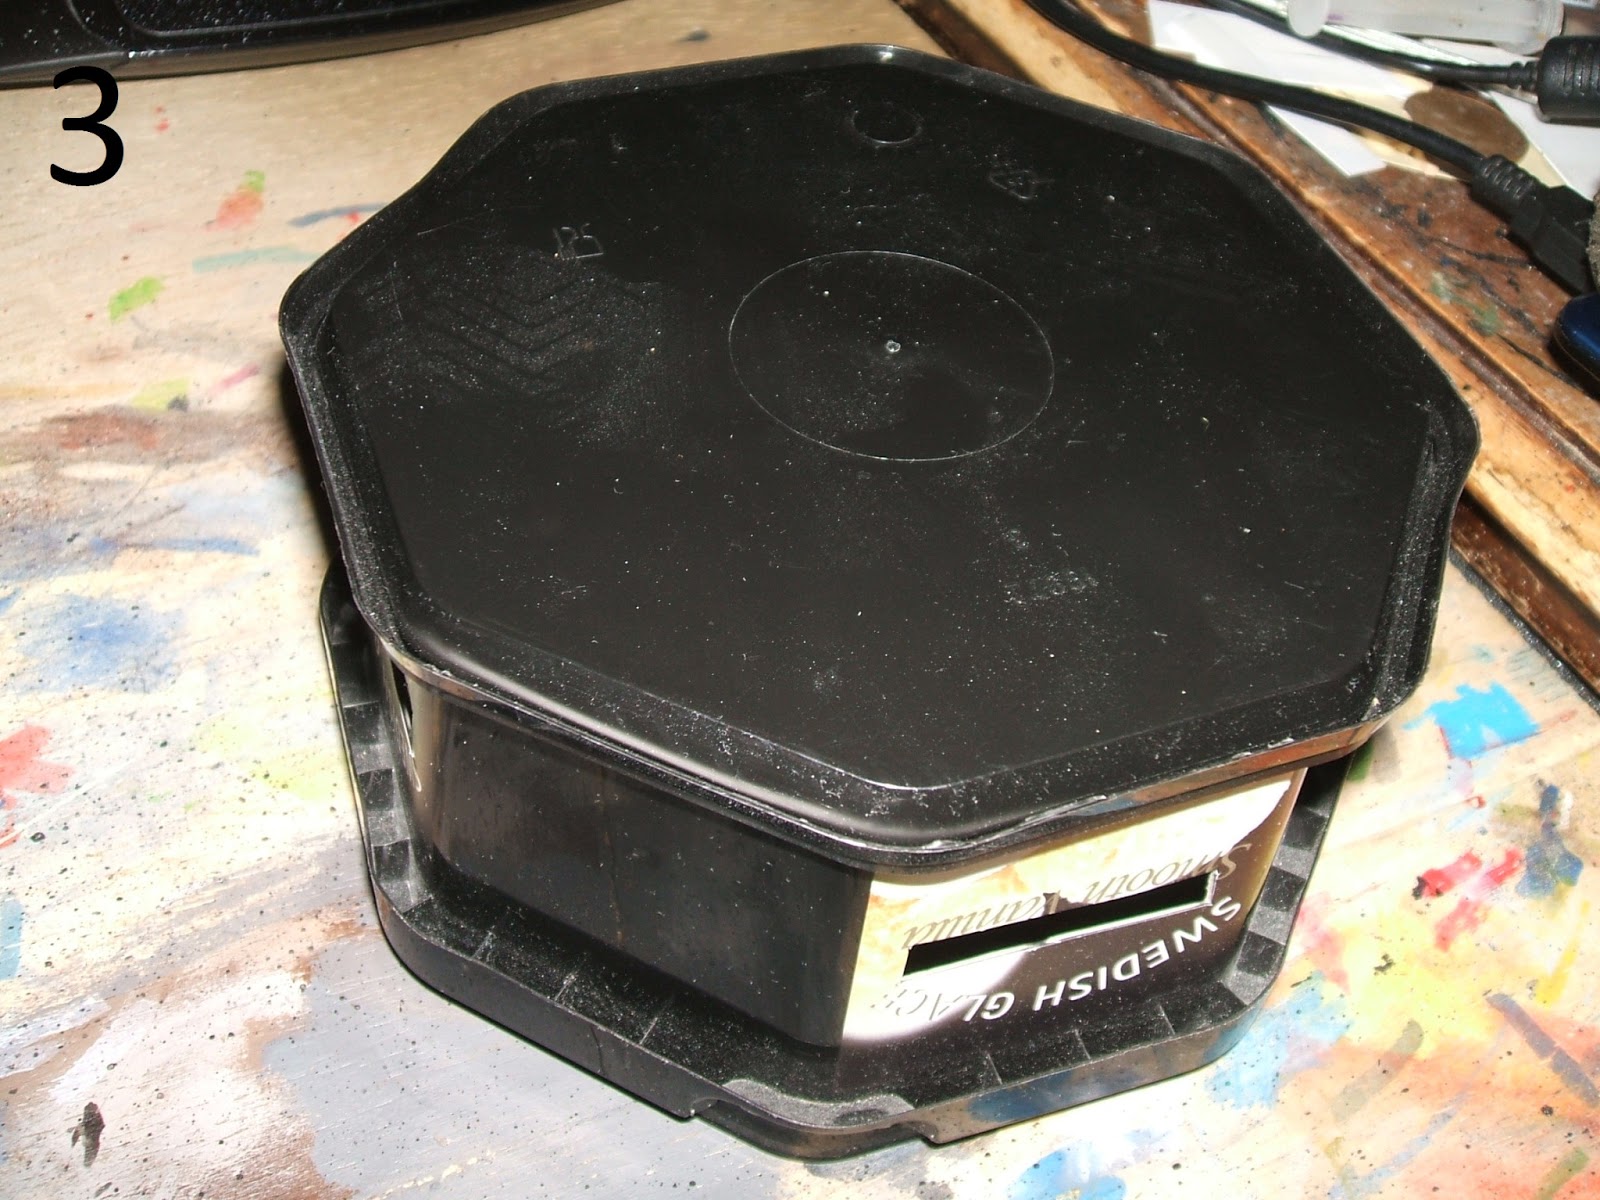
2) Test fit the lid of the container on the bottom of the container. See Fig. 3. The tub I'm using has a loose fit, which is exactly what you want.
3) Get some 5mm thick foamcard. See Fig. 4. Cut it to fit the interior (or exterior, if you prefer) sides of the tub. In this instance I cut rectangles of 65 by 50mm, one for each of the sides I wanted to bulk out. See Fig. 5.
4) Glue alternating panels in place with a hot glue gun. See Fig. 6.
5) Trim the remaining panels to fit into the gaps, and then glue them in place with the hot glue gun. See Fig. 7.
6) Extend the vision slits you carved in the tub through the foamcard. See Fig. 8.
7) Knock up a door from some spare bits of plasticard. See Fig. 9. Glue the door in place, and use some foamcard offcuts to make a set of steps up to the door, if necessary.
8) Glue sand over the structure, taking particular care to avoid the door and not to block the vision slits. This sort of plastic does not take kindly to glue, so you will probably need to take a couple of passes at this. See Fig. 10.
9) Paint and you're ready to go.

As you can see from Figs 11 & 12, while a standing infantryman has "line of sight" out of the vision slits, the same cannot be said for the barrels of heavy weapons. My next article in this series of terrain tutorials will cover a few variations on this general build which can offer something potentially more appealing to the eye or gaming table.


Related Posts Plugin for WordPress, Blogger...